GENERATING RANDOM PIPES FOR FLAPPY BIRD IN PYTHON PYGAME
Now, we will create a getRandomPipe() function which we will use to generate random pipes as the name itself suggests.
We would have two pipes one is upper pipe and the second is lower pipe.
Let’s first discuss how we’ll blit our pipes. We’ll blit our upper pipes and lowerpipes.
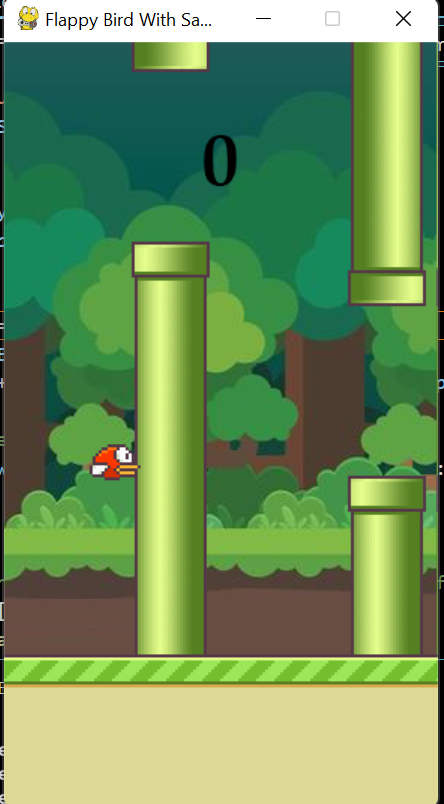
So we can see there is gap between our pipes to pass our bird. We would have to declare the offset value for it.
And we will blit our pipes in randomly it will increase the difficulty level and it will give us the realistic feel of the game.
CREATING FUNCTION FOR GENERATING RANDOM PIPES
In the getRandomPipe() we would have a list that would have dictionaries that will contain x and y values for our pipes. X of both pipes will same and we will give the value of x as screen width + 10 after then we will move the pipe.
Let’s see in coding language because that’s what we understand better.
y1 is for upper pipes and y2 is for lower pipes.
pipe = [ {'x': x value for pipe, 'y': y1}, #values for upper pipe
         {'x': x value for pipe, 'y': y2}  #values for lower pipe
  ]
First, we will obtain y for the lower pipe which is y2.
We will need such random values that our pipe shouldn’t overlap the whole screen and should be some gap that is offset between upper and lower pipes.
This part is a little bit tricky and has some mathematical operations. I’m explaining it but if your focus is on making the game then you can ignore this.
So, we will generate some random value by adding the offset and then
We will subtract the base height from the screenheight(SH) and then will subtract 1.5*offset. It is the value that came from so many experiments. So as I said earlier you will get the value just by the trial and error method.
Look at the picture below to relate with all this what I am saying. The extra red outline you are seeing is that it’s out from our Screen but it exists so we have to generate the value considering the top-left point of the pipe.
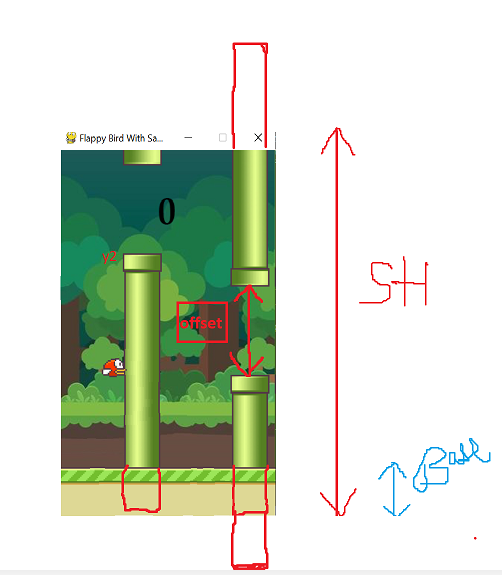
So don’t think about this and let’s come to code that how we will write all this in code and will generate the y for our lower pipe.
y2 = offset + random.randrange(0, int(SCREENHEIGHT - GAME_SPRITES['base'].get_height() - 1.2 *offset))random.randrange() is a function that generates random values between ranges.
Generating y-coordinate for upper pipes
We saw how we generated y-coordinate for our lower pipe. Now we’ll see how we can generate y-coordinate for upper pipes
y1 = pipeHeight - y2 + offsetWhat we did is we subtracted the y2 which we obtained previously from the pipe height and then added offset in them and we got the appropriate y-coordinate for our upper pipes. What we did is we subtracted the y2 which we obtained previously from the pipe height and then added offset in them and we got the appropriate y-coordinate for our upper pipes.
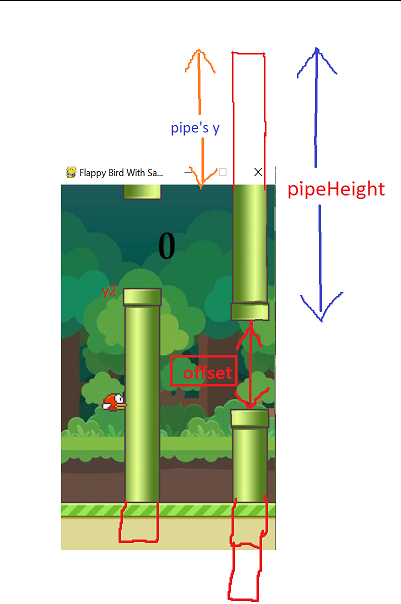
Now, we will combine all this in the getRandomPipe() function. Notice our upper pipe is above the Screen so the value of the Y will be negative. Now let’s see the code.
def getRandomPipe():
    """
    generating positions of the two pipes one upper pipe and other lower pipe
    To blit on the Screen
    """

    pipeHeight = GAME_SPRITES['pipe'][0].get_height()
    offset = SCREENHEIGHT/4.5
    y2 = offset + random.randrange(0, int(SCREENHEIGHT - GAME_SPRITES['base'].get_height() - 1.2 *offset))
    pipeX = SCREENWIDTH + 10
    y1 = pipeHeight - y2 + offset
    pipe = [
        {'x': pipeX, 'y': -y1}, #Upper Pipes
        {'x': pipeX, 'y': y2}   #Lower Pipes
    ]
    return pipe
We have created our getRandomPipe() function now it’s time to use that. So let’s see the code for that.
Creating upper and Lower Pipes for the game
#Creating upper and Lower Pipes for the game
    newPipe1 = getRandomPipe()
    newPipe2 = getRandomPipe()

    # Upper pipe List
    upperPipes = [
        {'x':SCREENWIDTH + 200, 'y': newPipe1[0]['y']},
        {'x':SCREENWIDTH + 200 + (SCREENWIDTH/2), 'y': newPipe2[0]['y']}
    ]

    #lists of Lower Pipe
    lowerPipes = [
        {'x':SCREENWIDTH + 200, 'y': newPipe1[1]['y']},
        {'x':SCREENWIDTH + 200 + (SCREENWIDTH/2), 'y': newPipe2[1]['y']}
    ]
1st and 2nd lines of code say that we created two variables newPipe1 and newPipe2 and gave them the random value which we obtained from the getRandomPipe() function.
And then we made two lists upperPipes and lowerPipes.
In the upperPipes list, we gave two values of x and y. The first value of x and y is the pipe that is blitted on the screen and the second value is for another upper pipe that is blitted at some distance from the first.
Same logic applied with the lowerPipes list. We gave them some gap because when our pipe will be moving which we’ll see after some time then the player should have enough space to pass the pipes.
So now it’s time to blit our sprites, we can also do it later but for your curious mind. Let’s blit what we have done yet.
while True:
    for event in pygame.event.get():

        if event.type == QUIT or (event.type == KEYDOWN and event.key == K_ESCAPE):
            pygame.quit()
            sys.exit()

    # Lets blit our sprites now
    SCREEN.blit(GAME_SPRITES['background'], (0, 0))
    for upperPipe, lowerPipe in zip(upperPipes, lowerPipes):
        SCREEN.blit(GAME_SPRITES['pipe'][0], (upperPipe['x'], upperPipe['y']))
        SCREEN.blit(GAME_SPRITES['pipe'][1], (lowerPipe['x'], lowerPipe['y']))

    SCREEN.blit(GAME_SPRITES['base'], (basex, GROUNDY))
    SCREEN.blit(GAME_SPRITES['player'], (playerx, playery))
    pygame.display.update()
    FPSCLOCK.tick(FPS)
We have discussed the blit function already so there is nothing to explain in it but the one thing you will see is the zip. So let me explain what it does. No, let me show you then you would understand it better.
ZIP EXPLANATION
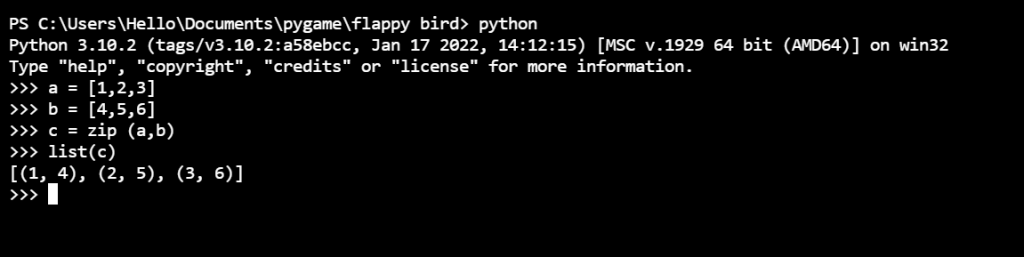
Now you can see what the zip does. It basically mixes the values of the two lists and there is nothing to explain in the above code. So, now we should move further