Recap
In our previous post on Django framework, we learned about the basics of Django, the built-in functionalities in it, pros and cons of using Django, difference between a Django project and Django app and understood the working of MVT architecture of Django. I have covered many things in my previous post about Django, so If you haven’t read it, then here you go.
In this part of Django series, we will begin developing a full-fledged Django blog as we spoke about it in our previous part of the series. It will have the functionality of adding posts, deleting them, updating, and a user authentication system to have new users on our website. So lets get our hands on it. We will be using python 3 in this series, so make sure you at least have python version 3.3 or higher. To check your current python version, open up your terminal and type:
> python -V
Virtual Environments
Virtual environments are isolated directories which doesn’t get mixed with your original system files. Each virtual environment has its own Python binary (which matches the version of the binary that was used to create this environment) and can have its own independent set of installed Python packages in its site directories. Suppose you have multiple projects which use the same python package, e.g. Django. Now it maybe possible that you want to upgrade a package in a project but you don’t want that version in another project.
So, if you upgrade your global packages, it could break some of your other projects. To avoid this, a virtual environment is used. It has its own python binary, pip and packages, doesn’t affect your global site packages, and you can create as much as virtual environments you want.
We will be making our Django project in a virtual environment. Let’s first create a folder named Environments and make our virtual env in it. There are two ways I will show here to create a virtual environment, open up your command line:
Way 1
> mkdir Environments
cd Environments
Environments> python -m venv env_django
Here we created a folder called Environments, changed our directory in it and created a virtual environment with the built-in venv module in python, so no pip installation is required. I named it env_django, but you can name it whatever you want.
Way 2
In the terminal switch to Environments folder and type:
> pip install virtualenv
> virtualenv env_django
Here, we are using the virtualenv module to create virtualenv.
Activating and deactivating virtual envs:
After creating a virtual env, we have to activate it to use it. To activate a virtual env, In your terminal type:
> env_django\Scripts\activate
To deactivate it afterwards:
> env_django\Scripts\deactivate
The command is same for activating or deactivating virtual envs whether you used the first method or the second method to create it.
You will see the name of your virtual env in a parenthesis before your directory.
(env_django) Environments>
Do a “pip list” command to check if your virtual environment is working. If only two or three modules are shown then your virtual env is working.
Starting a project
As we saw in our previous post, how to start a new project in Django, But first we need to install Django in our virtual env. In your terminal, type:
> pip install Django
After the installation proceed to create the project:
> django-admin startproject django_project
I am naming it django_project, you can name it whatever you want.
We have already seen the file structure of Django and what is each file for in our previous post, if you haven’t read it then here you go.
We will change our directory into the project folder and then create an app and name it “blog”.
> cd django_project
> django-admin startapp blog
Then open your project folder in a code editor. I personally use VS Code, but you can use which ever text editor or IDE you want.
Registering our app
After creating any app or if are using a third-party module in Django, you will need to register it in the settings.py file. Open your settings.py file and add the name of your app in the INSTALLED_APPS list within a string. Don’t forget to put commas as this is a list.
INSTALLED_APPS = [
'blog',
'django.contrib.admin',
'django.contrib.auth',
'django.contrib.contenttypes',
'django.contrib.sessions',
'django.contrib.messages',
'django.contrib.staticfiles',
]
Making a template
As per the MVT model of Django, lets first start by making an html template to show something on our website. In Django, the convention of making templates is, in the app which you are making a template, create a folder and name it “templates”, then make another folder in it by the same name as your app, for me it is blog. Then in this folder add all your HTML templates for your app. So, the directory now seems something like this:
Your_app/templates/your_app_name/all_your_templates
So now open your blog app, create a folder and name it “templates”, then create another folder in the templates and name it blog. Then create a file and name it home.html.
django_project> cd blog
django_project\blog> mkdir templates\blog
After this in the blog folder (the one which is templates folder) create a file and name it home.html.
For me the file structure is something like this:
blog/templates/blog/home.html
Lets now add some html code
<html lang="en">
<head>
<meta charset="UTF-8">
<meta http-equiv="X-UA-Compatible" content="IE=edge">
<meta name="viewport" content="width=device-width, initial-scale=1.0">
<title>Home</title>
</head>
<body>
<h1>Hello there</h1>
</body>
</html>
You don’t need to add the meta tags now, that’s just something which VS Code genereates for me by default for html files. We will add more code later on but let’s create a view for now.
Creating a view
Let’s create a view for our Django application.
Open the views.py file in the blog folder and add the following code:
from django.shortcuts import render
def home(request):
return render(request, 'blog/home.html')
In the above code, render is imported by default by Django for us. Next, we created a function-based view and named home. Then we rendered the request argument along with our template.
Adding a URL route
Next, we will add a URL route to our website. What we will do here is we will make a urls.py file in the “blog” app. Then we will register it into our main project url.py module.
j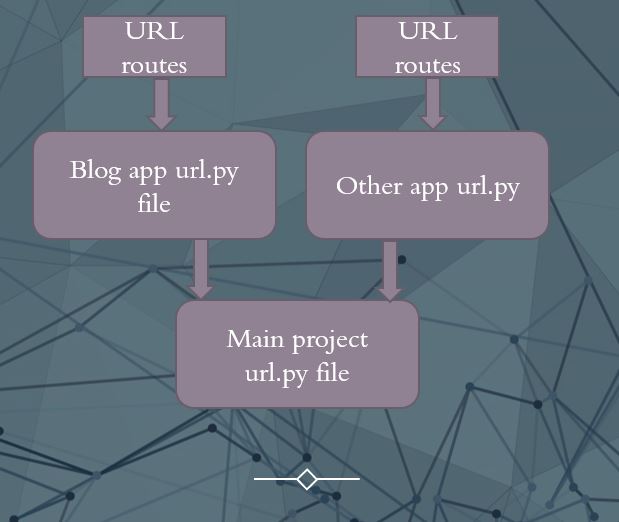
Its overall structure will look something like the image shown above.
So first create a file in blog app and name it urls.py. Then add the following code in it.
from django.urls import path
from . import views
urlpatterns = [
path('', views.home, name='blog-home'),
]
Here we imported path from Django.urls. The . in the second line means from the current folder, so we imported our views which we created in the views.py file.
Then we added our url patterns. We used the path function which we imported and passed the url route as an argument, which is blank in my case, as I want my home page to be the default page of our website. If you don’t want it so then you can change it to whatever you want. We also passed the view which we created and called it as blog-home.
Next we have to register our blog URLs in the main urls.py file. Open the main urls.py file in the project folder and add this in the urlpatterns:
First import the include function from django.urls
from django.urls import path, include
Then add this in your urlpatterns
path('', include('blog.urls')),
Now it should look something like this:
from django.contrib import admin
from django.urls import path, include
urlpatterns = [
path('admin/', admin.site.urls),
path('', include('blog.urls')),
]
Running our server:
Now we are ready to start our server and check out our website in a browser. Open up your terminal in the virtual environment we created and type:
> python manage.py runserver
If you haven’t done any errors while coding, this command will start the local server and give you the link to your server, or else it will throw out an error. By default, it is hosted on 127.0.0.1 also called ‘localhost on port 8000 (http://127.0.0.1:8000/).

This is how our home page looks right now:

Designing our Home Page
Type CTRL-C to stop the server. Next, we will add more HTML with CSS to design the look of our home page. But before doing this we will make a base.html file. The purpose of a base.html file is to follow the principle of DRY (Don’t Repeat Yourself) in programming. What we will do is, all the code which we will use repeatedly, will be added to base template. Instead of writing the code again and again, we will just import it from base.html.
So, create a file in templates/blogs and name it base.html. So,Then add the code from the base.html in my GitHub repository. We will go through it one by one. The first line of the code says
{ % load static %}
This the curly braces and percent signs are used to add code which handles our templates in Django. It is called a template tag, as it operates between the Django templates. What the “load static” keyword will do is it will check for static files like CSS and JavaScript. After that, we have our regular HTML.
I also used Bootstrap to make our site responsive and more beautiful. If you go further down you will see another template tag which is a “content block”. What it does is it will copy all the code till where a block starts. Then all the code we need between can be taken from another file till the block ends. We will be doing this with our home.html file.
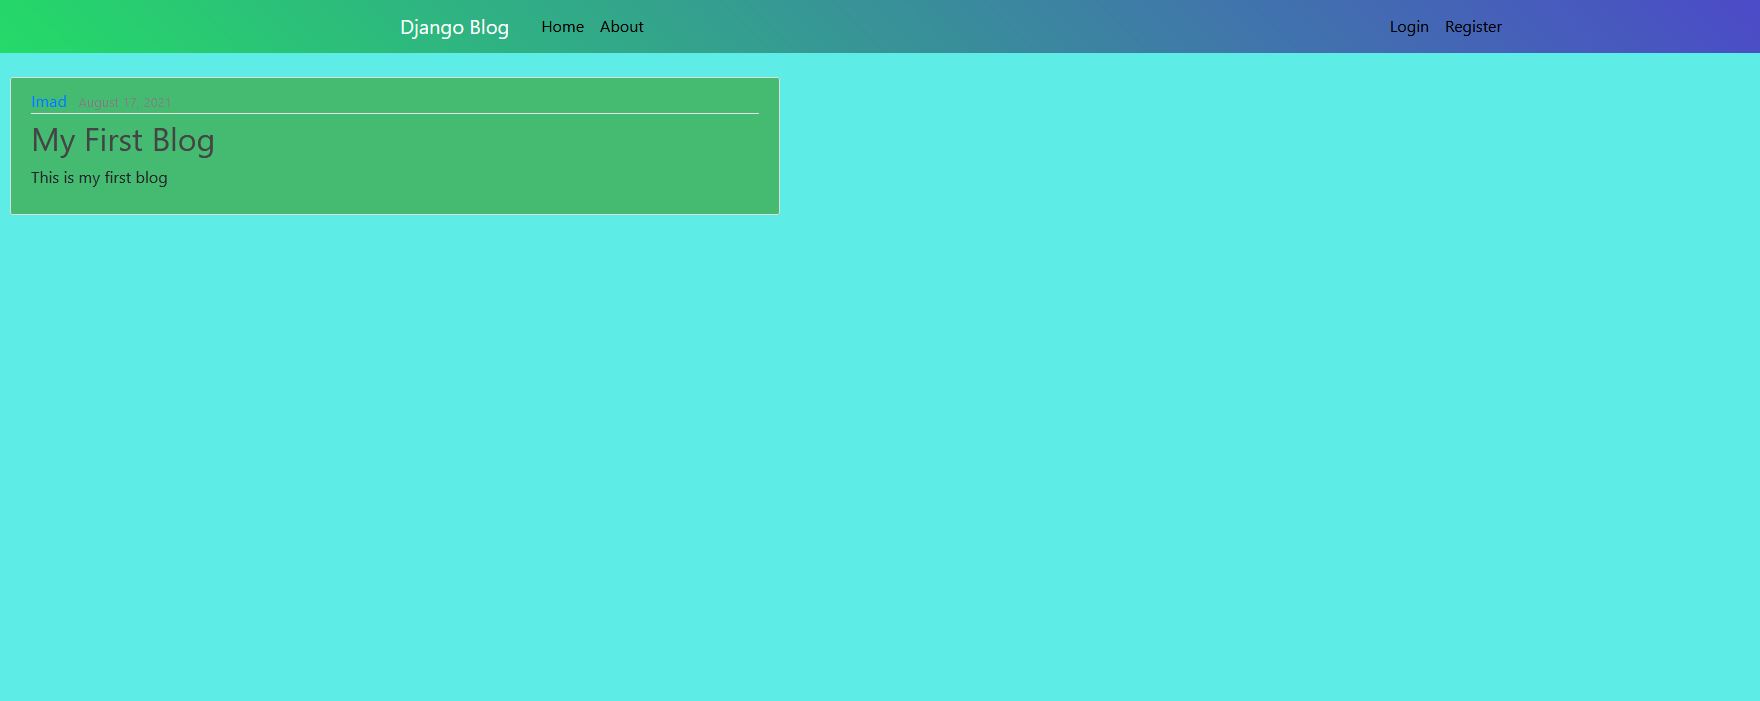
Now we will edit our home.html. Copy the code in the home.html file available on my GitHub. In this file we have just extended the same base template without repeating our code. Then I have opened a block, gave it name “content”, and added the code needed for an article.
If you observe, I also added a for loop to loop over all the posts we will create and list them one by one. The text in double curly braces between our HTML are variables, used to represent what data goes where. In the {{ date_posted }} variable, I used a filter using the | (pipe) character. It helps us to represent date in the format we want. If you want to change the format, you could refer to this article.
Creating a Model
We will now create a model to create posts on our website. It will have the name of the author, title, content and the date it was posted. Open your model.py file in blog app and add the following code:
from django.db import models
from django.utils import timezone
from django.contrib.auth.models import User
class Post(models.Model):
title = models.CharField(max_length=100)
content = models.TextField()
date_posted = models.DateTimeField(default=timezone.now)
author = models.ForeignKey(User, on_delete=models.CASCADE)
def __str__(self):
return self.title
To understand what’s happening here:
Line 1-3: We imported models from Django to create one. Then we are importing the timezone module and the User class. User class is a built-in class in Django which represents the current user.
Lines 4-8: Created a class called model, passed the models.Model class as a parameter. Then we added code to represent our title, content, the date it was posted on and the name of the author. The on_delete=models.CASCADE means that ones the user is deleted, all its posts should also be deleted.
Next, we will adjust our views.py file to show our data. We will add a little code so our views.py file seems something like this:
from django.shortcuts import render
from .models import Post
def home(request):
context = {
'posts': Post.objects.all()
}
return render(request, 'blog/home.html', context)
So, what is changed here is we imported our Post model from models.py and added a dictionary called context and passed it as an argument to render. It will now display our posts in our block which we made in home.html file.
Next, we need to add CSS to our website. In Django, static files are stored in a separate folder in an app. So, in your blog app, create a folder and name it “static”. Then create another folder in it with the same name as your app. In my case it is “blog”. Then in the blog folder copy the main.css file from my github in it.
Now we are nearly done except that we need to register our Post model in the Django admin page and create a superuser for the Django admin page.
Registering your Model to admin page:
To register our model on the Django admin page, open your admin.py file and add the following code:
from django.contrib import admin
from .models import Post
admin.site.register(Post)
Now save all of this and fire up your terminal to create a superuser for your Django admin page.
In your terminal type:
> python manage.py createsuperuser
This will create a superuser for you. Just put the information it asks and don’t forget the username and password.
Migrations
As we have created a model, we need to migrate it. Migrations are Django’s way of propagating changes you make to your models (adding a field, deleting a model, etc.) into your database schema. They’re designed to be mostly automatic, but you’ll need to know when to make migrations, when to run them, and the common problems you might run into. To run a migration in your terminal type:
> python mange.py makemigrations
This command will make the files required for a migrations. Next type
> python manage.py migrate
If you have no errors in your code then this will run smoothly. If not then check your code thoroughly for any possible errors. Now let’s start our server and check how does it looks like. It will only show a blank page. To add a post, go to 127.0.0.1/8000/admin. This will open the Django administration login page. Log in with the credentials you gave while creating the super user. You will see the blog section over there and the name of the model you created, which is in our case, the Post model. Click on it and create a post. Save it and then check your home page. You will see the post you created there.
With this we will end this part of our django series, and create a user authentication system and much more in our upcoming parts.
Stay tuned and keep learning !!