Today, we will create a Chat App with Node.js and Socket.io that would allow users to communicate through a web interface in real time.
The HTML and CSS would be used to create the user interface for the chat app, including the input fields for messages and the display area for messages from other users.
The sockets would be used to handle the real-time communication between the clients and the server.
Using this chat app, users will be able to send and receive messages in real-time, without the need for page refreshes or other interruptions. Overall, this chat app will provide a fast and seamless way for users to communicate with each other.
Features
- Chat with others using the power of sockets
- An own backend server for sockets communication
- Different UI for your sent message and received message
- Total number of online users at a time
- Real-Time Connection
- Make the UI update without refreshing the page
Source code
Note: after you download the source code for Chat App with Node.js and Socket.io and wanted to know how to run the project we recommend you to watch our video output.
Requirements
- Code Editor (VS Code Preferred)
- Chromium Browser (Chrome Preferred)
- Basic Knowledge of HTML, CSS, Javascript, and sockets
- Working Node js installed in your computer
Check if Node.js is installed on your system:
you can open a terminal or command prompt and run the following command:
node -v
If Node.js is installed, this command will print the version number to the terminal. If it is not installed, you will see an error message saying that the node command is not recognized.
Install Nodejs on your device:
- Go to the official Node.js website (https://nodejs.org/) and click on the “Download” button.
- On the download page, select the Windows Installer (.msi) option under the “Recommended For Most Users” section.
- Save the installer file to your computer and run it. This will start the installation process.
- Follow the prompts in the installer to complete the installation. This typically involves accepting the license agreement and selecting the destination folder for the Node.js files.
- Once the installation is complete, you can verify that Node.js was installed correctly by opening a command prompt or Windows PowerShell window and typing “node -v”. This should print the version number of Node.js that was installed.
- You can now use Node.js to run JavaScript code on your Windows machine.
Setting up files, and folders, and installing libraries
To begin, we will first create a folder for all our code, then we will create another folder with the name server, this folder will be the point where all our backend connections will be put to work.
We need to create a blank Node.js app with index.js as the starting point, you can follow these steps:
- Open a command prompt or terminal window and navigate to the directory where you want to create your Node.js app.
- Run the following command to create a package.json file for your app:
- npm init
- Follow the prompts to enter the details for your apps, such as the name, version, and description. When asked for the entry point, enter “index.js” as the starting point for your app.
- Once the package.json file has been created, create a file named index.js within the same folder.
After we are done with this set the start to “node ./index.js” inside package.json.
"start": "node ./index.js"
To install the socket library, run the following command in the terminal:
npm install socket.io
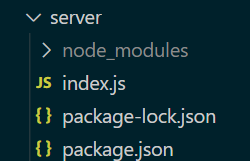
Folder structure for chat app with Node.js
Now, your package.json file should look like this:
{
  "name": "server",
  "version": "1.0.0",
  "description": "Simple Chat App Server",
  "main": "index.js",
  "scripts": {
    "test": "echo \"Error: no test specified\" && exit 1",
    "start" : "node ./index.js"
  },
  "author": "",
  "license": "ISC",
  "dependencies": {
    "socket.io": "^4.5.1"
  }
}
A folder for node_modules will be created as well
The folder structure would look like this:
Backend of Chat App with Node.js and Socket.io
Now, we will begin writing the backend code for our chat app in the index.js file
index.js
// Import the 'socket.io' library and start a server on port 3000
const io = require('socket.io')(3000, { cors: { origin: "*" } });

// Create an object to store the names of connected users, indexed by their socket ID
const users = {};

// Keep track of the number of online users
let onlineUsers = 0;

// Listen for incoming connections
io.on('connection', socket => {

  // When a new user connects, increment the online user count and notify all clients
  onlineUsers = onlineUsers + 1;
  socket.emit('increaseUserCount', onlineUsers);

  // When a user joins the chat, store their name and notify all clients
  socket.on('userJoined', name => {
    users[socket.id] = name;
    socket.broadcast.emit('user-joined', { name: users[socket.id], concurrentUsers: onlineUsers })
  })

  // When a user sends a message, broadcast it to all other clients
  socket.on('send', data => {
    socket.broadcast.emit('receive', { message: data.message, name: users[socket.id], id: data.id })
  })

  // When a user disconnects, decrement the online user count and notify all clients
  socket.on('disconnect', () => {
    onlineUsers = onlineUsers - 1;
    socket.broadcast.emit('disconnected', { name: users[socket.id], concurrentUsers: onlineUsers })
    delete users[socket.id]
  })

})
Install dependencies
npm installRunning server/backend of our chat app
Use the following command to run the server:
npm startFrontend of Chat App in HTML and CSS
index.html
<!DOCTYPE html>
<html lang="en">
<head>
    <meta charset="UTF-8">
    <!-- This tag ensures that the page is rendered properly on different browsers -->
    <meta http-equiv="X-UA-Compatible" content="IE=edge">
    <!-- This tag sets the viewport to the device's width and scales the content to 1.0 -->
    <meta name="viewport" content="width=device-width, initial-scale=1.0">
    <title>Chat App</title>
    <!-- This link tag imports the styles defined in the "style.css" file -->
    <link rel="stylesheet" href="./style.css">
    <!-- This script tag imports the socket.io library from the specified URL -->
    <script defer src="http://localhost:3000/socket.io/socket.io.js"></script>
    <!-- This script tag imports the "user.js" script file -->
    <script defer src="./user.js"></script>
</head>
<body>
    <div class="container">
        <div class="chatBox" id="chatBox">
            <div class="chatHead">
                <p>Simple Chat App</p>
                <div class="usersCount">
                    online:
                    <span id="concurrentUsers">0</span>
                </div>
            </div>
            <div class="chattings" id="chatting">
                <!-- This div will contain the chat messages -->
            </div>
            <form action="#" id="messageForm">
                <input type="text" id="messageInput" placeholder="Enter your message">
                <button id="sendButton">Send</button>
            </form>
        </div>
    </div>
</body>
</html>
style.css
html{
    scroll-behavior: smooth;
}

body {
    margin: 0;
    padding: 0;
    box-sizing: border-box;
}

.container {
    position: relative;
    width: 100vw;
    height: 100vh;
    overflow: hidden;
}

.chatBox {
    position: relative;
    background-color: white;
    box-shadow: -2px 2px 10px rgba(0, 0, 0, 0.65);
    height: 100%;
    margin: auto;
    top: 50%;
    transform: translateY(-50%);
    display: flex;
    padding-bottom: 20px;
    flex-direction: column;
}

.chatHead{
    width: 100%;
    display: flex;
    font-size: large;
    font-weight: 900;
    align-items: center;
}

.chatHead p{
    font-family: fantasy;
    letter-spacing: 1px;
    font-size: 2rem;
    font-weight: 900;
    margin: 10px auto;
    text-align: center;
    color: rgb(0, 34, 255);
}


.usersCount{
    color: rgb(0, 0, 0);
    align-items: center;
    position: absolute;
    right: 10px;
}

.usersCount span{
    letter-spacing: 2px;
    margin-left: 4px;
}


#messageForm{
    display: flex;
    position: absolute;
    bottom: 4px;
    left: 0;
    margin: 5px 5px;
    width: 100%;
}

#messageForm input{
    width: 100%;
    outline: none;
    border: none;
    padding: 8px 60px 8px 10px;
    font-weight: 500;
    border: 1px solid green;
    color: rgb(16, 16, 16);
}

#sendButton{
    outline: none;
    border: none;
    position: absolute;
    top: 50%;
    right: 0px;
    transform: translateY(-50%);
    background-color: green;
    color: white;
    padding: 8px 12px;
    cursor: pointer;
    transition: .3s;
    font-weight: 500;
}

#sendButton:hover{
    background-color: green;
}


.chattings{
    display: flex;
    flex-direction: column;
    padding: 10px 10px;
    overflow-y: auto;
    margin-bottom: 30px;
}


.chattings::-webkit-scrollbar{
    width: 6px;
}


.chattings::-webkit-scrollbar-thumb{
    width: 6px;
    border-radius: 4px;
    background-color: green;
}


.message{
    color: white;
    background-color: green;
    max-width: 35%;
    display: flex;
    position: relative;
    flex-direction: column;
    margin-bottom: 12px;
    word-wrap: break-word;
    padding: 8px 10px;

}

.message span{
    font-size: 8px;
    color: rgba(255, 255, 255, 0.637);
}

.message p{
    margin: 0;
    margin-top: 2px;
    font-size: 0.8rem;
}

.center{
    align-self: center;
    border-radius: 8px;
    background-color: green;
    color: rgb(16, 16, 16);
    text-align: center;
}

.message.center p{
    font-size: 12px;
}


.right{
    border-radius: 20px;
    align-self: flex-end;
}

.left{
    border-radius: 20px;
    align-self: flex-start;
}
user.js
We have created user.js to handle chat logic and functionality using JavaScript with socket.io library.
// Import the `socket.io` library and create a new socket connection to the server at the specified URL
const socket = io("http://localhost:3000");

// Select the `.container` element from the DOM
const body = document.querySelector(".container");

// Select the `#chatBox` element from the DOM
const chatBox = document.getElementById("chatBox");

// Select the `#concurrentUsers` element from the DOM
const concurrentUsers = document.getElementById("concurrentUsers");

// Select the `#chatting` element from the DOM
const messageContainer = document.getElementById("chatting");

// Select the `#messageForm` element from the DOM
const form = document.getElementById("messageForm");

// Select the `#messageInput` element from the DOM
const messageInput = document.getElementById("messageInput");

// Define two arrays of words to be used for generating a random username
verbs = ["quick", "lazy", "sleepy", "noisy", "hungry"];
adjectives = ["fox", "dog", "racoon", "heyana", "crow", "cat"];

// Generate two random numbers to select a verb and an adjective from the above arrays
var randNum1 = Math.floor(Math.random() * adjectives.length);
var randNum2 = Math.floor(Math.random() * verbs.length);

// Generate a random username by concatenating a random verb and a random adjective
const name = verbs[randNum2] + " " + adjectives[randNum1];

// Emit an event called "userJoined" to the server, along with the randomly generated username
socket.emit("userJoined", name);

// Listen for an "increaseUserCount" event from the server and update the value of the `concurrentUsers` element accordingly
socket.on("increaseUserCount", (data) => {
  concurrentUsers.innerText = data;
});

// Listen for a "disconnected" event from the server and update the UI accordingly
socket.on("disconnected", (data) => {
  userJoinUiUpdate(`${data.name} left the Chat`, "center");
  concurrentUsers.innerHTML = data.concurrentUsers;
});

socket.on("disconnected", (data) => {
  userJoinUiUpdate(`${data.name} left the Chat`, "center");
  concurrentUsers.innerHTML = data.concurrentUsers;
});
//////////////////

// Listen for a "user-joined" event from the server and update the UI accordingly
socket.on("user-joined", (data) => {
  userJoinUiUpdate(`${data.name} Joined the Chat`, "center");
  concurrentUsers.innerText = data.concurrentUsers;
});

// Listen for a "receive" event from the server and update the UI accordingly
socket.on("receive", (data) => {
  messageUiUpdate(data.message, data.name, "left", data.id);
});

// Add an event listener to the `form` element that listens for the "submit" event
form.addEventListener("submit", (e) => {
  // Prevent the default behavior of the form submission
  e.preventDefault();

  // Get the value of the `messageInput` element
  const message = messageInput.value;

  // If the message is empty, return without doing anything
  if (message === "") {
    return;
  }

  // Generate a random ID for the message
  const id = Math.round(Math.random() * 100000);

  // Update the UI with the new message
  messageUiUpdate(message, "You", "right", id);

  // Emit a "send" event to the server, along with the message and its ID
  socket.emit("send", { message, id });

  // Clear the `messageInput` element
  messageInput.value = "";
});

////
const userJoinUiUpdate = (message, position) => {
  // Create a new `div` element to contain the message
  const messageUi = document.createElement("div");

  // Create a new `p` element to contain the text of the message
  const pElement = document.createElement("p");

  // Set the text of the `p` element to be the message passed to the function
  pElement.innerText = message;

  // Add the "message" and "position" classes to the `div` element
  messageUi.classList.add("message");
  messageUi.classList.add(position);

  // Append the `p` element to the `div` element
  messageUi.append(pElement);

  // Append the `div` element to the message container
  messageContainer.append(messageUi);

  // Set the scroll position of the message container to the bottom
  messageContainer.scrollTop = messageContainer.scrollHeight;
};

const messageUiUpdate = (message, user, position, id) => {
  // Create a new `div` element to contain the message
  const messageUi = document.createElement("div");

  // Create a new `span` element to contain the user's name
  const span = document.createElement("span");

  // Create a new `i` element to contain the user's avatar (not shown in the code)
  const i = document.createElement("i");

  // Create a new `p` element to contain the text of the message
  const p = document.createElement("p");

  // Set the text of the `p` element to be the message passed to the function
  p.innerText = message;

  // Set the text of the `span` element to be the user's name passed to the function
  span.innerText = user;

  // Append the `span`, `i`, and `p` elements to the `div` element
  messageUi.append(span);
  messageUi.append(i);
  messageUi.append(p);

  // Add the "message" and "position" classes to the `div` element
  messageUi.classList.add(position);
  messageUi.classList.add("message");

  // Set the `id` attribute of the `div` element to be the `id` passed to the function
  messageUi.setAttribute("id", id);

  // Append the `div` element to the message container
  messageContainer.append(messageUi);

  // Set the scroll position of the message container to the bottom
  messageContainer.scrollTop = messageContainer.scrollHeight;
};
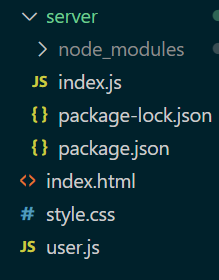
Complete folder structure:
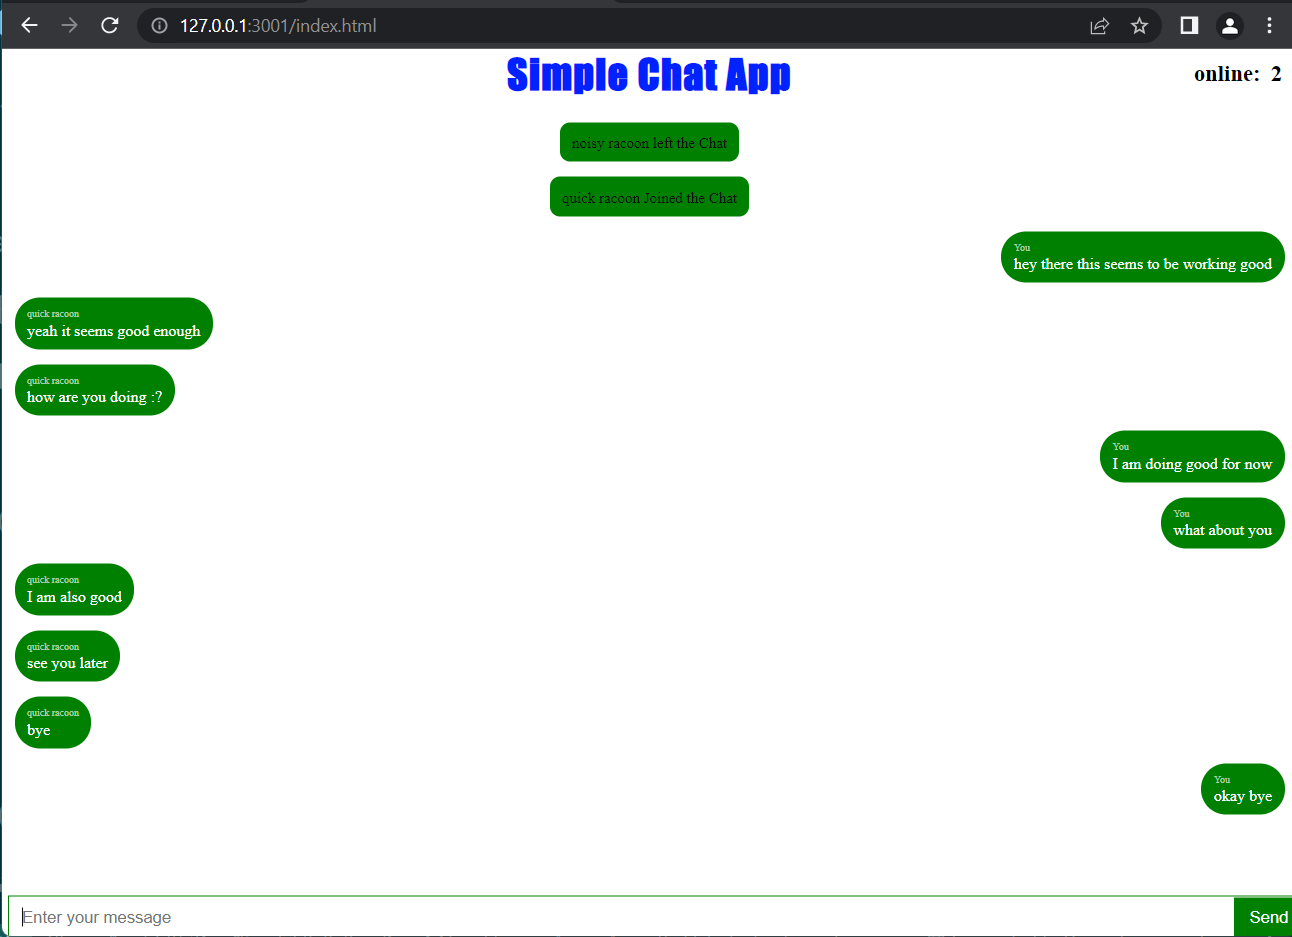
Output for Chat App with Node.js and Socket.io:
Image output:
Video output:
Thank you for visiting our website.
Also Read:
- What is web development for beginners?
- Chat App with Node.js and Socket.io
- Draw Doraemon using HTML and CSS
- Draw House using HTML and CSS
- Draw Dog using CSS
- Rock Paper Scissor in HTML CSS JavaScript
- Pong Game in HTML and JavaScript
- Tip Calculator in HTML and JavaScript
- Calculator in HTML CSS JavaScript
- BMI Calculator in HTML CSS JavaScript
- Color picker in HTML and JavaScript
- Number Guessing Game in JavaScript
- ATM in JavaScript
- Inventory Management System in JavaScript
- Courier Tracking System in HTML CSS and JS
- Word Count App in JavaScript
- To-Do List in HTML CSS JavaScript
- Tic-Tac-Toe game in JavaScript
- Music player using HTML CSS and JavaScript
- Happy Diwali in JavaSCript


