Introduction
CRUD stands for Create, Read, Update and Delete operations using a database and these are the operations which is the core of many applications. Today, we will build a simple application on CRUD Operations in Servlet & JSP with the Mysql database. This project is suitable for people with a firm understanding of Java web-based projects.
Project Overview: CRUD Operations in Servlet & JSP
| Project Name: | Simple application on CRUD Operations in Servlet & JSP |
| Abstract: | We are going to build a simple application to perform CRUD Operations in Servlet. |
| Language Used: | Java |
| IDE: | Eclipse IDE Enterprise Edition |
| Java version (Recommended): | Java SE 18.0. 2.1 |
| Database: | MySQL |
| Type: | Web Application |
| Recommended for: | Java Servlet beginners |
| Time to build: | 3-4 hours |
Features of simple application on CRUD Operations in Servlet
- Create a user
- Retrieve a user
- View all users
- Update the user
- Delete a user
Tools and Technologies used
Please insure that you have JDK installed on your system, If not then follow this tutorial to install it. We also require the following jar files for this application
Setup the development environment
Before starting the project we need to ensure that the Tomcat server is configured with the Eclipse IDE. For this, you can follow this tutorial.
Open the Eclipse IDE and create a new Dynamic web project by clicking the File > New > Dynamic Web Project. Give the project a name as usermanagement. If you don’t find the option to create a Dynamic Web Project, refer to this tutorial.
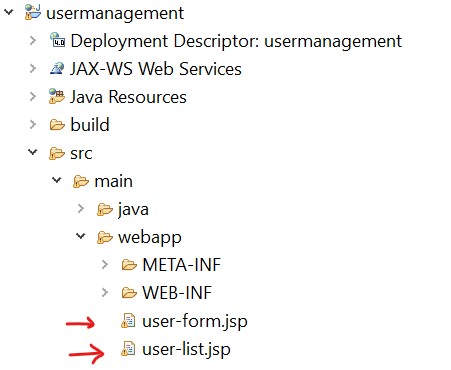
Now, we need to add all the dependencies of the project. For this expand the project like this usermanagement > src > main > webapp > WEB-INF > lib and copy all the jar files except tomcat which you have downloaded in your download folder and paste it into the lib folder. The folder structure should look like this –

MySQL Setup for CRUD Operations in Servlet
We also need to set up the MySQL database for the CRUD Operations in Servlet. We will use the MySQL workbench to create a database and a table in it. If you have not installed MySQL on your system, please refer to this tutorial. Now, open the MySQL workbench and run the following commands.
CREATE DATABASE demo;

USE demo;

create table users (
	id  int(3) NOT NULL AUTO_INCREMENT,
	name varchar(120) NOT NULL,
	email varchar(220) NOT NULL,
	country varchar(120),
	PRIMARY KEY (id)
);

Coding the simple application on CRUD Operations in Servlet
There are three major packages that we are going to create for this project.
- DAO (Data Access Object) – This folder consists of all the logic for the database
- Model – This folder consists of Java classes for the backend logic
- Web – This consists of JSP files which are basically used to design the frontend
Let’s create these packages first. Expand the project like this – usermanagement > Java Resources > src

Right-click on the src folder and create a new package with these names

Now create three java classes by right-clicking on these packages and select new classes with the following names:

Code for UserDao.java file
package com.java.usermanagement.dao;

import java.sql.Connection;
import java.sql.DriverManager;
import java.sql.PreparedStatement;
import java.sql.ResultSet;
import java.sql.SQLException;
import java.util.ArrayList;
import java.util.List;

import com.java.usermanagement.model.User;

public class UserDAO {
	 	private String jdbcURL = "jdbc:mysql://localhost:3306/demo?useSSL=false";
	    private String jdbcUsername = "root";
	    private String jdbcPassword = "root";

	    private static final String INSERT_USERS_SQL = "INSERT INTO users" + "  (name, email, country) VALUES " +
	        " (?, ?, ?);";

	    private static final String SELECT_USER_BY_ID = "select id,name,email,country from users where id =?";
	    private static final String SELECT_ALL_USERS = "select * from users";
	    private static final String DELETE_USERS_SQL = "delete from users where id = ?;";
	    private static final String UPDATE_USERS_SQL = "update users set name = ?,email= ?, country =? where id = ?;";

	    public UserDAO() {}

	    protected Connection getConnection() {
	        Connection connection = null;
	        try {
	            Class.forName("com.mysql.jdbc.Driver");
	            connection = DriverManager.getConnection(jdbcURL, jdbcUsername, jdbcPassword);
	        } catch (SQLException e) {
	            // TODO Auto-generated catch block
	            e.printStackTrace();
	        } catch (ClassNotFoundException e) {
	            // TODO Auto-generated catch block
	            e.printStackTrace();
	        }
	        return connection;
	    }

	    public void insertUser(User user) throws SQLException {
	        System.out.println(INSERT_USERS_SQL);
	        // try-with-resource statement will auto close the connection.
	        try (Connection connection = getConnection(); PreparedStatement preparedStatement = connection.prepareStatement(INSERT_USERS_SQL)) {
	            preparedStatement.setString(1, user.getName());
	            preparedStatement.setString(2, user.getEmail());
	            preparedStatement.setString(3, user.getCountry());
	            System.out.println(preparedStatement);
	            preparedStatement.executeUpdate();
	        } catch (SQLException e) {
	            printSQLException(e);
	        }
	    }

	    public User selectUser(int id) {
	        User user = null;
	        // Step 1: Establishing a Connection
	        try (Connection connection = getConnection();
	            // Step 2:Create a statement using connection object
	            PreparedStatement preparedStatement = connection.prepareStatement(SELECT_USER_BY_ID);) {
	            preparedStatement.setInt(1, id);
	            System.out.println(preparedStatement);
	            // Step 3: Execute the query or update query
	            ResultSet rs = preparedStatement.executeQuery();

	            // Step 4: Process the ResultSet object.
	            while (rs.next()) {
	                String name = rs.getString("name");
	                String email = rs.getString("email");
	                String country = rs.getString("country");
	                user = new User(id, name, email, country);
	            }
	        } catch (SQLException e) {
	            printSQLException(e);
	        }
	        return user;
	    }

	    public List < User > selectAllUsers() {

	        // using try-with-resources to avoid closing resources (boiler plate code)
	        List < User > users = new ArrayList < > ();
	        // Step 1: Establishing a Connection
	        try (Connection connection = getConnection();

	            // Step 2:Create a statement using connection object
	            PreparedStatement preparedStatement = connection.prepareStatement(SELECT_ALL_USERS);) {
	            System.out.println(preparedStatement);
	            // Step 3: Execute the query or update query
	            ResultSet rs = preparedStatement.executeQuery();

	            // Step 4: Process the ResultSet object.
	            while (rs.next()) {
	                int id = rs.getInt("id");
	                String name = rs.getString("name");
	                String email = rs.getString("email");
	                String country = rs.getString("country");
	                users.add(new User(id, name, email, country));
	            }
	        } catch (SQLException e) {
	            printSQLException(e);
	        }
	        return users;
	    }

	    public boolean deleteUser(int id) throws SQLException {
	        boolean rowDeleted;
	        try (Connection connection = getConnection(); PreparedStatement statement = connection.prepareStatement(DELETE_USERS_SQL);) {
	            statement.setInt(1, id);
	            rowDeleted = statement.executeUpdate() > 0;
	        }
	        return rowDeleted;
	    }

	    public boolean updateUser(User user) throws SQLException {
	        boolean rowUpdated;
	        try (Connection connection = getConnection(); PreparedStatement statement = connection.prepareStatement(UPDATE_USERS_SQL);) {
	            statement.setString(1, user.getName());
	            statement.setString(2, user.getEmail());
	            statement.setString(3, user.getCountry());
	            statement.setInt(4, user.getId());

	            rowUpdated = statement.executeUpdate() > 0;
	        }
	        return rowUpdated;
	    }

	    private void printSQLException(SQLException ex) {
	        for (Throwable e: ex) {
	            if (e instanceof SQLException) {
	                e.printStackTrace(System.err);
	                System.err.println("SQLState: " + ((SQLException) e).getSQLState());
	                System.err.println("Error Code: " + ((SQLException) e).getErrorCode());
	                System.err.println("Message: " + e.getMessage());
	                Throwable t = ex.getCause();
	                while (t != null) {
	                    System.out.println("Cause: " + t);
	                    t = t.getCause();
	                }
	            }
	        }
	    }
}
Code for User.java file
package com.java.usermanagement.model;

public class User {
	protected int id;
	protected String name;
	protected String email;
	protected String country;

	public User() {
	}

	public User(String name, String email, String country) {
		super();
		this.name = name;
		this.email = email;
		this.country = country;
	}

	public User(int id, String name, String email, String country) {
		super();
		this.id = id;
		this.name = name;
		this.email = email;
		this.country = country;
	}

	public int getId() {
		return id;
	}
	public void setId(int id) {
		this.id = id;
	}
	public String getName() {
		return name;
	}
	public void setName(String name) {
		this.name = name;
	}
	public String getEmail() {
		return email;
	}
	public void setEmail(String email) {
		this.email = email;
	}
	public String getCountry() {
		return country;
	}
	public void setCountry(String country) {
		this.country = country;
	}
}
Code for UserServlet.java file
package com.java.usermanagement.web;

import java.io.IOException;
import java.io.IOException;
import java.sql.SQLException;
import java.util.List;

import javax.servlet.RequestDispatcher;
import javax.servlet.ServletException;
import javax.servlet.annotation.WebServlet;
import javax.servlet.http.HttpServlet;
import javax.servlet.http.HttpServletRequest;
import javax.servlet.http.HttpServletResponse;

import javax.servlet.ServletException;
import javax.servlet.annotation.WebServlet;
import javax.servlet.http.HttpServlet;
import javax.servlet.http.HttpServletRequest;
import javax.servlet.http.HttpServletResponse;

import com.java.usermanagement.dao.UserDAO;
import com.java.usermanagement.model.User;

@WebServlet("/")
public class UserServlet extends HttpServlet {
	private static final long serialVersionUID = 1L;
    private UserDAO userDAO;

    public UserServlet() {
    	 this.userDAO = new UserDAO();
    }


	protected void doPost(HttpServletRequest request, HttpServletResponse response) throws ServletException, IOException {
		 doGet(request, response);
	}

	protected void doGet(HttpServletRequest request, HttpServletResponse response) throws ServletException, IOException {
		  String action = request.getServletPath();

	        try {
	            switch (action) {
	                case "/new":
	                    showNewForm(request, response);
	                    break;
	                case "/insert":
	                    insertUser(request, response);
	                    break;
	                case "/delete":
	                    deleteUser(request, response);
	                    break;
	                case "/edit":
	                    showEditForm(request, response);
	                    break;
	                case "/update":
	                    updateUser(request, response);
	                    break;
	                default:
	                    listUser(request, response);
	                    break;
	            }
	        } catch (SQLException ex) {
	            throw new ServletException(ex);
	        }
	}

	  private void listUser(HttpServletRequest request, HttpServletResponse response)
			    throws SQLException, IOException, ServletException {
			        List < User > listUser = userDAO.selectAllUsers();
			        request.setAttribute("listUser", listUser);
			        RequestDispatcher dispatcher = request.getRequestDispatcher("user-list.jsp");
			        dispatcher.forward(request, response);
			    }

			    private void showNewForm(HttpServletRequest request, HttpServletResponse response)
			    throws ServletException, IOException {
			        RequestDispatcher dispatcher = request.getRequestDispatcher("user-form.jsp");
			        dispatcher.forward(request, response);
			    }

			    private void showEditForm(HttpServletRequest request, HttpServletResponse response)
			    throws SQLException, ServletException, IOException {
			        int id = Integer.parseInt(request.getParameter("id"));
			        User existingUser = userDAO.selectUser(id);
			        RequestDispatcher dispatcher = request.getRequestDispatcher("user-form.jsp");
			        request.setAttribute("user", existingUser);
			        dispatcher.forward(request, response);

			    }

			    private void insertUser(HttpServletRequest request, HttpServletResponse response)
			    throws SQLException, IOException {
			        String name = request.getParameter("name");
			        String email = request.getParameter("email");
			        String country = request.getParameter("country");
			        User newUser = new User(name, email, country);
			        userDAO.insertUser(newUser);
			        response.sendRedirect("list");
			    }

			    private void updateUser(HttpServletRequest request, HttpServletResponse response)
			    throws SQLException, IOException {
			        int id = Integer.parseInt(request.getParameter("id"));
			        String name = request.getParameter("name");
			        String email = request.getParameter("email");
			        String country = request.getParameter("country");

			        User book = new User(id, name, email, country);
			        userDAO.updateUser(book);
			        response.sendRedirect("list");
			    }

			    private void deleteUser(HttpServletRequest request, HttpServletResponse response)
			    throws SQLException, IOException {
			        int id = Integer.parseInt(request.getParameter("id"));
			        userDAO.deleteUser(id);
			        response.sendRedirect("list");

			    }


}
Now we need to create two JSP files for the front end. This is where the HTML and CSS code is written for the UI. Expand the project like this usermanagement > src > main > webapp. Now right-click on webapp folder and add two JSP files user-form.jsp and user-list.jsp

Code for user-form.jsp file
<%@ page language="java" contentType="text/html; charset=UTF-8"
 pageEncoding="UTF-8"%>
    <%@ taglib uri="http://java.sun.com/jsp/jstl/core" prefix="c"%>
        <html>

        <head>
            <title>User Management Application</title>
            <link rel="stylesheet" href="https://stackpath.bootstrapcdn.com/bootstrap/4.3.1/css/bootstrap.min.css" integrity="sha384-ggOyR0iXCbMQv3Xipma34MD+dH/1fQ784/j6cY/iJTQUOhcWr7x9JvoRxT2MZw1T" crossorigin="anonymous">
        </head>

        <body>

            <header>
                <nav class="navbar navbar-expand-md navbar-dark" style="background-color: #AB46D2">
                    <div>
                        <a href="https://www.violet-cat-415996.hostingersite.com/" class="navbar-brand"> User Management</a>
                    </div>

                    <ul class="navbar-nav" style="background-color: #F65A83">
                        <li><a href="<%=request.getContextPath()%>/list" class="nav-link">Users</a ></li>
                    </ul>
                </nav>
            </header>
            <br>
            <div class="container col-md-5">
                <div class="card">
                    <div class="card-body">
                        <c:if test="${user != null}">
                            <form action="update" method="post">
                        </c:if>
                        <c:if test="${user == null}">
                            <form action="insert" method="post">
                        </c:if>

                        <caption>
                            <h2>
                                <c:if test="${user != null}">
                                    Edit User
                                </c:if>
                                <c:if test="${user == null}">
                                    Add New User
                                </c:if>
                            </h2>
                        </caption>

                        <c:if test="${user != null}">
                            <input type="hidden" name="id" value="<c:out value='${user.id}' />" />
                        </c:if>

                        <fieldset class="form-group">
                            <label>User Name</label> <input type="text" value="<c:out value='${user.name}' />" class="form-control" name="name" required="required">
                        </fieldset>

                        <fieldset class="form-group">
                            <label>User Email</label> <input type="text" value="<c:out value='${user.email}' />" class="form-control" name="email">
                        </fieldset>

                        <fieldset class="form-group">
                            <label>User Country</label> <input type="text" value="<c:out value='${user.country}' />" class="form-control" name="country">
                        </fieldset>

                        <button type="submit" class="btn btn-success" style="background-color: #AB46D2">Save</button>

                    </div>
                </div>
            </div>
        </body>

        </html>
Code for user-list.jsp file
<%@ page language="java" contentType="text/html; charset=UTF-8"
 pageEncoding="UTF-8"%>
    <%@ taglib uri="http://java.sun.com/jsp/jstl/core" prefix="c"%>
        <html>

        <head>
            <title>User Management Application</title>
            <link rel="stylesheet" href="https://stackpath.bootstrapcdn.com/bootstrap/4.3.1/css/bootstrap.min.css" integrity="sha384-ggOyR0iXCbMQv3Xipma34MD+dH/1fQ784/j6cY/iJTQUOhcWr7x9JvoRxT2MZw1T" crossorigin="anonymous">
        </head>

        <body>

            <header>
                <nav class="navbar navbar-expand-md navbar-dark" style="background-color: #AB46D2">
                    <div>
                        <a href="https://www.violet-cat-415996.hostingersite.com" class="navbar-brand"> User
     Management </a>
                    </div>

                    <ul class="navbar-nav">
                        <li><a href="<%=request.getContextPath()%>/list" class="nav-link">Users</a></li>
                    </ul>
                </nav>
            </header>
            <br>

            <div class="row">
                <!-- <div class="alert alert-success" *ngIf='message'>{{message}}</div> -->

                <div class="container">
                    <h3 class="text-center">List of Users</h3>
                    <hr>
                    <div class="container text-left">

                        <a href="<%=request.getContextPath()%>/new" class="btn btn-success" style="background-color: #F65A83">Add
     New User</a>
                    </div>
                    <br>
                    <table class="table table-bordered">
                        <thead>
                            <tr>
                                <th>Name</th>
                                <th>Email</th>
                                <th>Country</th>
                                <th>Actions</th>
                            </tr>
                        </thead>
                        <tbody>
                            <!--   for (Todo todo: todos) {  -->
                            <c:forEach var="user" items="${listUser}">

                                <tr>
                                    <td>
                                        <c:out value="${user.name}" />
                                    </td>
                                    <td>
                                        <c:out value="${user.email}" />
                                    </td>
                                    <td>
                                        <c:out value="${user.country}" />
                                    </td>
                                    <td><a href="edit?id=<c:out value='${user.id}' />">Edit</a>      <a href="delete?id=<c:out value='${user.id}' />">Delete</a></td>
                                </tr>
                            </c:forEach>
                            <!-- } -->
                        </tbody>

                    </table>
                </div>
            </div>
        </body>

        </html>
Output for CRUD Operations in Servlet:
Image output:
Before running the project make sure your MySQL server is running on the desired port. For this, you can simply just open the MySQL workbench and click on Local instance MySQL. Now, Run the project by right-clicking on the project name and clicking run on the server. Then choose the tomcat server and your project to run.
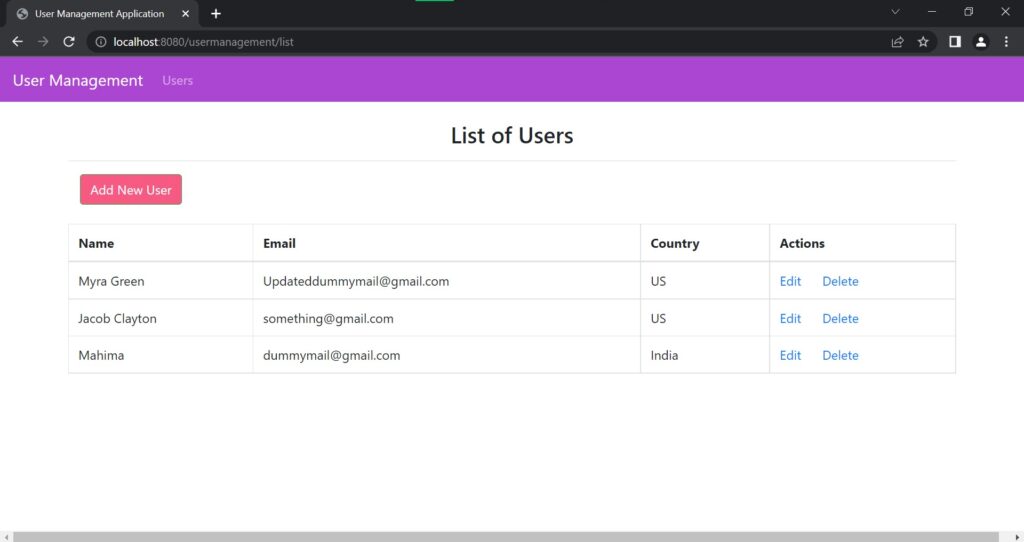
When we run the application, the first page looks like this:-

Click on the add new user button and you will be directed to the add new user page which looks like this:–


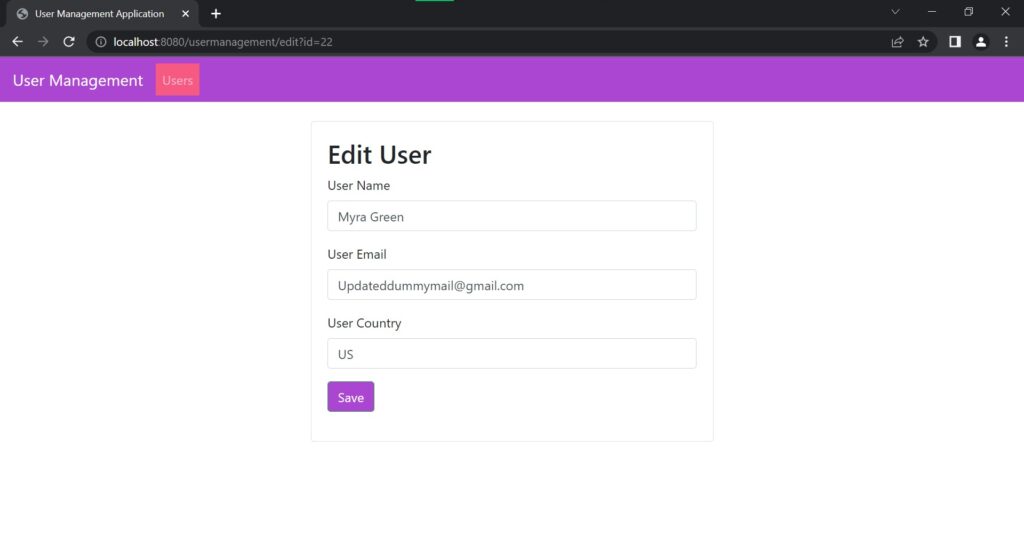
Click on the Edit button and the edit page will get opened which looks like this:–


Click on the delete button to delete a user:-

Video output:
For reference, I have shown how to run the project below in the video.
Conclusion
In the end, we have our fully functional simple application on CRUD Operations in Servlet & JSP with MySQL database. I hope you would have learned a lot by building this application. There are various technologies used in this project which makes it a good project for learning to build advanced applications in Java. Now, you can try to enhance the appearance(User Interface) of this web app and also try to keep more information about the user.
Thank you for visiting our website.
Also Read:
- Dino Game in Java
- Java Games Code | Copy And Paste
- Supply Chain Management System in Java
- Survey Management System In Java
- Phone Book in Java
- Email Application in Java
- Inventory Management System Project in Java
- Blood Bank Management System Project in Java
- Electricity Bill Management System Project in Java
- CGPA Calculator App In Java
- Chat Application in Java
- 100+ Java Projects for Beginners 2023
- Airline Reservation System Project in Java
- Password and Notes Manager in Java
- GUI Number Guessing Game in Java
- How to create Notepad in Java?
- Memory Game in Java
- Simple Car Race Game in Java
- ATM program in Java
- Drawing Application In Java
- Tetris Game in Java
- Pong Game in Java
- Hospital Management System Project in Java
- Ludo Game in Java
- Restaurant Management System Project in Java
- Flappy Bird Game in Java
- ATM Simulator In Java
- Brick Breaker Game in Java
- Best Java Roadmap for Beginners 2023
- Snake Game in Java


