Introduction
In this article, we are going to create an ATM program in Java for representing ATM transactions. In the ATM program, the user has to select an option from the options displayed on the screen. The options are available to view the available balance, withdraw amount, deposit amount, check the mini statement, and exit.
Code for ATM program in Java
First, let’s see the code for the ATM program in Java then we will see the output.
Create a project in Eclipse and give the name AtmStimulation or anything you want. Then create a package with the same name AtmSimulation. Then add a class file ATM.java and paste the following code.
ATM.java
package AtmSimulator;
public class ATM {
    private double balance=10000;
    private double depositAmount;
    private double withdrawAmount;

    //default constructor
    public ATM(){
    }

    //getter setter
    public double getBalance() {
        return balance;
    }

    public void setBalance(double balance) {
        this.balance = balance;
    }

    public double getDepositAmount() {
        return depositAmount;
    }

    public void setDepositAmount(double depositAmount) {
        this.depositAmount = depositAmount;
    }

    public double getWithdrawAmount() {
        return withdrawAmount;
    }

    public void setWithdrawAmount(double withdrawAmount) {
        this.withdrawAmount = withdrawAmount;
    }
}
The mentioned code is used to create the important variables to store balance, deposit amount, and Withdraw amount. Then getters and setters methods for those variables are created.
Now, create a new Interface inside the same package AtmStimulator named AtmOpInterface.java, and add the below code in it.
AtmOpInterface.java
package AtmSimulator;

public interface AtmOpInterface {
    public void viewBalance();
    public void withdrawAmount(double withdrawAmount);
    public void depositAmount(double depositAmount );
    public  void viewMiniStatement();
}
This code is used to create an interface AtmOpInterface which contains method declaration to view the balance, withdraw amount, deposit amount, and view the mini statement.
Then create a new class named AtmOperations.java to write the method logic mentioned in the AtmOpInterface.
AtmOperations.java
package AtmSimulator;

import java.util.HashMap;
import java.util.Map;
import java.util.Scanner;

public class AtmOperations implements AtmOpInterface{
    ATM atm=new ATM();
    Map<Double,String> ministmt=new HashMap<>();

    //Method to View Balance
    @Override
    public void viewBalance() {
    	System.out.println("\nLoading Accout Balance.......");
        System.out.println("Your Current Balance is : "+atm.getBalance());
        	System.out.println();
    }

    //Method to Withdraw Amount
    @Override
    public void withdrawAmount(double withdrawAmount) {
    	Scanner sc=new Scanner(System.in);
        if(withdrawAmount%100==0) {
            if (withdrawAmount <= atm.getBalance()) {
            	System.out.println("Confirm? Y/N");
            	String confirm=sc.next();
            	if(confirm.equals("Y")) {
                ministmt.put(withdrawAmount, " Amount Withdrawn");
                System.out.println("Collect the Cash " + withdrawAmount);
                atm.setBalance(atm.getBalance() - withdrawAmount);
                viewBalance();
            	}
            } else {
                System.out.println("Insufficient Balance !!");
            }
        }
        else {
            System.out.println("Please enter the amount in multipal of 100");
        }

    }

    //Method to ddeposit Amount
    @Override
    public void depositAmount(double depositAmount) {
    	System.out.println("Confirm? Y/N");
    	Scanner sc=new Scanner(System.in);
    	String confirm=sc.next();
	    if(confirm.equals("Y")) {
        ministmt.put(depositAmount," Amount Deposited");
        System.out.println(depositAmount+" Deposited Successfully !!");
        atm.setBalance(atm.getBalance()+depositAmount);
        viewBalance();

	    }
    }

    //Method to View Mini Statement
    @Override
    public void viewMiniStatement() {
        for(Map.Entry<Double,String> m:ministmt.entrySet()){
            System.out.println(m.getKey()+""+m.getValue());
        }
    }
}
Now, create a class Main.java from which we will call the methods required and write the print statements displayed to the user.
Main.java
package AtmSimulator;

import java.util.Scanner;
public class Main {

    public static void main(String[] args) {
        AtmOpInterface op=new AtmOperations();
        int atmpin=123;
        Scanner in=new Scanner(System.in);
        System.out.println("Welcome to your bank account !!!");

            while(true){
                System.out.println("\n1.View Available Balance\n2.Withdraw Amount\n3.Deposit Amount\n4.View Ministatement\n5.Exit\n");
                System.out.print("Enter Choice : ");
                int ch=in.nextInt();

                if(ch==1){
                	System.out.print("Enter ATM Pin: ");
                    int pin=in.nextInt();
                	if(atmpin == pin){
                		 System.out.println("Account Authorized!\n");
                		 op.viewBalance();
                	    }
                	else{
                        System.out.println("Incorrect ATM pin");
                        System.exit(0);
                    }
                }

                else if(ch == 2){
                	System.out.print("Enter ATM Pin: ");
                    int pin=in.nextInt();
                	if(atmpin == pin){
                	    System.out.println("Account Authorized!\n");
                		System.out.println("Enter amount to withdraw ");
                		 	double withdrawAmount=in.nextDouble();
                		 	op.withdrawAmount(withdrawAmount);
                	 }
                	else{
                        System.out.println("Incorrect Atm Number or pin");
                        System.exit(0);
                    }
                }

                else if(ch == 3){
                	System.out.print("Enter ATM Pin: ");
                    int pin=in.nextInt();
                	if(atmpin==pin){
                		System.out.println("Account Authorized! \n");
                        System.out.println("Enter Amount to Deposit :");
                        double depositAmount=in.nextDouble();
                        op.depositAmount(depositAmount);
                	}
                	else{
                         System.out.println("Incorrect Atm Number or pin");
                         System.exit(0);
                    }
                }

                else if(ch == 4){
                	System.out.print("Enter ATM Pin: ");
                    int pin=in.nextInt();
                	if(atmpin==pin){
                		 System.out.println("Account Authorized! \n");
                		 System .out.println("Mini Statement");
                		 System.out.println("************************");
                         op.viewMiniStatement();
                	 }
                }

                else if(ch == 5){
                    System.out.println("Collect your ATM Card\n Thank you for using ATM Machine!!");
                    System.exit(0);
                }

                else
                {
                    System.out.println("Please enter valid choice");
                }
            }
        }
    }
Output for ATM program in Java:
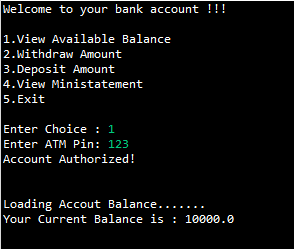
When we run the application, we are presented with the following options on our screen:

Let’s see what operations are performed for all these options and also check by giving an invalid option.
View Balance
Entering option 1 takes us to the “View Account Balance” option only when we enter the correct Atm pin. If we enter the wrong atm pin the prompt will show “Incorrect ATM pin”.

Once we’ve entered the correct PIN for our bank account, We are able to see the Current balance in our bank account.
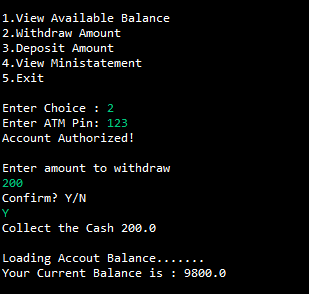
Withdraw Amount
To withdraw the money, we simply get the withdrawal amount from the user and remove that amount from the total balance and print the successful message.
Entering option 2 will load the cash withdrawal screen, wherein after we have entered the right PIN for our bank account, we will be able to enter an amount to withdraw from our account. If we enter an amount greater than the bank balance, we won’t be able to withdraw an amount. The prompt will show us “Insufficient Balance”

Immediately after that, we are prompted to enter the amount again, where we have put 200 which is within the current balance, so after getting a confirmation from us, it deducts the amount entered from our account. That is 200 rupees in this example and shows us the updated balance of money in our account.
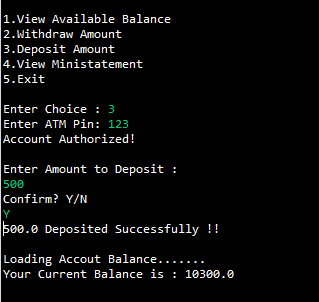
Deposit Money
To deposit the money, we simply get the deposit amount from the user, add it to the total balance and print the successful message.
On entering option 3, we are taken to the cash deposit option of the ATM, where we’ll be able to deposit an amount into our bank account. Here, we have entered 500 as the deposit amount, which is then immediately added to the bank balance after we validate that 500 is indeed the amount I wish to deposit into my account. Finally, it shows us the updated balance of money in our account.
View Mini Statement
On entering option 4, we can able to view the mini statement of the recent transactions made in our bank account.

Exit
On entering option 5 we can exit from the process. But if we give any option other than 1 to 5 we get a prompt saying “Please enter a valid choice”.

After entering 5, the prompt shows the following message and stops the process.

Conclusion
In this article, we have created an ATM program in Java for representing ATM transactions. We have implemented the options to view the available balance, withdraw amount, deposit amount, check the mini statement, and exit. Hope you enjoyed doing this application. Thanks, for reading!
Also Read:
- Dino Game in Java
- Java Games Code | Copy And Paste
- Supply Chain Management System in Java
- Survey Management System In Java
- Phone Book in Java
- Email Application in Java
- Inventory Management System Project in Java
- Blood Bank Management System Project in Java
- Electricity Bill Management System Project in Java
- CGPA Calculator App In Java
- Chat Application in Java
- 100+ Java Projects for Beginners 2023
- Airline Reservation System Project in Java
- Password and Notes Manager in Java
- GUI Number Guessing Game in Java
- How to create Notepad in Java?
- Memory Game in Java
- Simple Car Race Game in Java
- ATM program in Java
- Drawing Application In Java
- Tetris Game in Java
- Pong Game in Java
- Hospital Management System Project in Java
- Ludo Game in Java
- Restaurant Management System Project in Java
- Flappy Bird Game in Java
- ATM Simulator In Java
- Brick Breaker Game in Java
- Best Java Roadmap for Beginners 2023
- Snake Game in Java