Introduction to Jupyter Notebook
Whenever one starts programming the first aim of that person is to find an IDE that suits his/her needs. In ML there are times when you’ll want to keep a check on your data after doing a change. But in code editors like Vim, Vscode, etc. you have to run your program each time to do that. This is handled very elegantly by Jupyter Notebook by introducing entities called cells. This is the reason why Jupyter Notebooks are a great fit for Data scientists. It’s recommended that you have jupyter set up before reading this tutorial if not, read the Environment Setup tutorial in the series.
Creating your Notebook
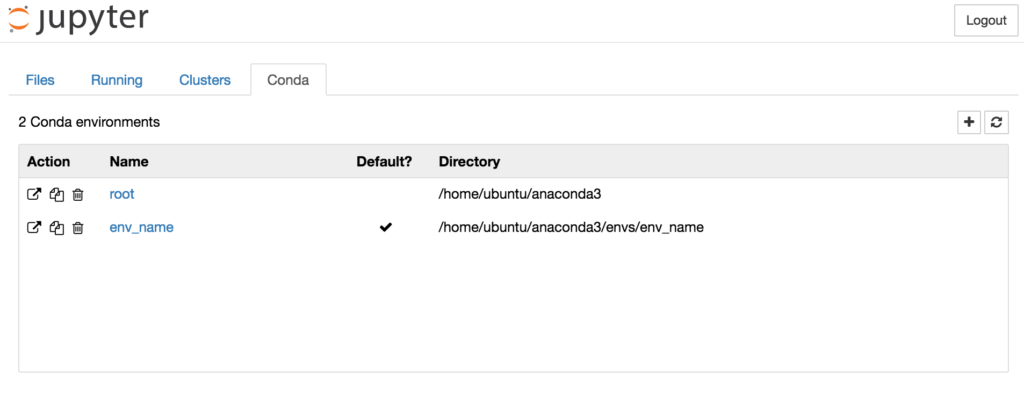
So let’s start by opening our notebook, in order to open jupyter you need to first activate your conda environment by writing the following command in the shell:-
#for Linux and Mac
conda activate base

#for Windows
activate base
Once you’ve activated your conda environment, you can activate conda in the directory you want to store your notebook in. To put it simply open your terminal in the folder you wanna store your notebook in. To do this, go to the folder and right-click. You’ll see an option called Open in Terminal. Click that and your terminal will open in that folder and then you can write a command to activate conda.
You can open your notebook by writing the following command:-
jupyter notebook
After you execute this command your terminal should be like this:-
After this, a new tab will automatically open in your default browser, which looks like the picture below:-

This is your Notebook Dashboard and it’ll show you all the files that you have in the directory you opened Jupyter from. Here you can manage your notebooks, other files, terminals, and extensions which you can download separately, click here to download/know more.
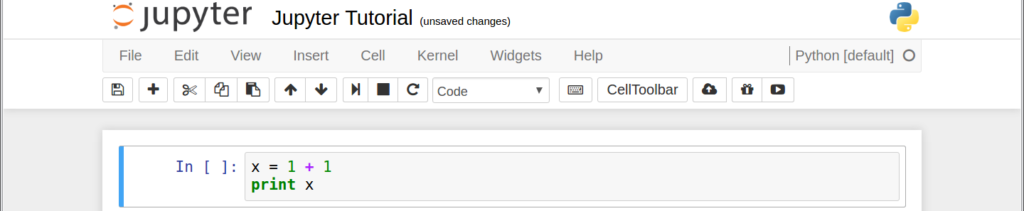
Next, you can click on the new button and select New > Python 3 this will create a new notebook for you in which you can write your code.

Notebook Cells
In your notebook, you have these boxes that you call cells. These cells are of two types:-
- Markdown Cells: These cells add text to your notebook. You can use this to write notes, make lists, and even add images. Not just that you can customize your text too, you can make it bold, italic, change the size of text, etc.
- Code Cells: These are your cell of interest, this is where you write your code and see the output generated.
- Raw Cells: These cells aren’t evaluated by the notebook kernel. You normally won’t use this cell. The only time you use this is when you’ll use a tool called nbconvert. It’s a tool used to convert the notebook to another format.
Notebook Modes
Jupyter cell has two modes:-
- Edit Mode: In this mode, you can edit your notebook but you can’t write anything in the cell. There are many things you can do like add cells, delete cells, customize cells, etc. To enter this mode you can press the ENTER key and you’ll be able to edit the content of that cell. It can be identified by the green border surrounding the cell:-

- Command Mode: In this mode, you can edit the content of your cell. To enter this mode you can press the ESC key and you’ll be able to edit the content of that cell. It can be identified by the blue border surrounding the cell:-
Notebook Shortcuts
- Command Mode: Esc
- Edit Mode: Enter
- Run selected cell: Ctrl+Enter(The output of the cell is the value of the variable in the last line of the cell)
- Run cell and insert below: Alt+Enter
- Run cell and select below: Shift+Enter
- Insert cell above(in Command Mode): A
- Insert cell below(in Command Mode): B
- Cut selected cells(in Command Mode): X
- Copy selected cells(in Command Mode): C
- Select Cell(in Command Mode): Shift + Up/Down Arrow Key
- Merge Selected Cells(in Command Mode): Shift + M
- Autocomplete(in Edit Mode): Tab
- Show Docstring of Function(in Edit Mode): Shift + Tab
For more keyboard shortcuts, you can go to Help > Keyboard Shortcuts from the Menu bar.

Magic Commands
Magic Commands are You can write code in different languages
%lsmagic
lsmagic is used to list all Magic Commands

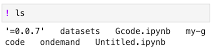
%ls
ls command is used to list the content of the directory. You can use it without %.
%cd <path>
Navigate to the <path>. You can use it without %.

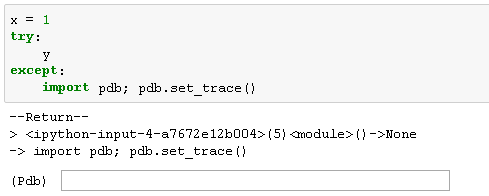
%pdb
pdb command enables Python Debugger whenever an error is encountered in the cell.
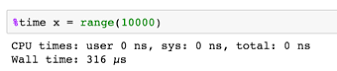
%time
time command tells the time taken for the execution of the code in the cell.
%%writefile <file>.py
The writefile command in the Jupyter notebook saves the code in the cell in a python file.

%run <file>.py
This run command in the Jupyter notebook is used to run a python file. Imagine that you have a file hello.py with the following content:
print(“hello world”)
You can run the following command in the notebook to run the file.
%run hello.py

? and !
- !: In jupyter cells you can run shell commands by adding! before the command. It’s pretty handy if you want to install python packages inside the notebook itself. And these commands can be any command that you want to run in the terminal just add! before the command, run the cell, and BAM!
- ?: There are tons of functions in python and tons of magic commands too. It’s hard to keep track of each of them and what they do. This is where? comes to help, literally. just add ? at the end of the magic command and you’ll see a string explaining what it does. The same goes for Python functions too.
Conclusion
And that’s pretty much it! Congrats now you have a good grasp on using Jupyter Notebook this will definitely make you more productive and help you code more efficiently.
Also Read:
- Machine Learning: A Gentle Introduction
 Introduction to Machine Learning Machine Learning is probably one of the most interesting and hyped branches of computer science. The thing that separates humans from machines is the fact that humans learn from their experiences. But is it possible to make a machine learn? And The answer is Yes! It is possible through Machine Learning….
 - Machine Learning Course DescriptionBefore you start, let me give you an overview of what this series has to offer you. Our machine learning course series comprises of the following sections:- ML Environment Setup and Overview Jupyter Notebook: The Ultimate Guide Numpy Pandas Matplotlib Seaborn Sklearn Linear Regression Logistic Regression Decision Tree Random Forest Support Vector Machine K Nearest…
- ML Environment Setup and OverviewIntroduction to Machine Learning In this article, you will learn about the ML Environment Setup, Machine Learning terminology, its paradigms, and a tutorial to help you set up your machine so you can code what you learn. Before we start with our ML Environment Setup, read this article to get an overview of machine learning….
- Jupyter Notebook: The Ultimate GuideIntroduction to Jupyter Notebook Whenever one starts programming the first aim of that person is to find an IDE that suits his/her needs. In ML there are times when you’ll want to keep a check on your data after doing a change. But in code editors like Vim, Vscode, etc. you have to run your…
- Numpy For Machine Learning: A Complete GuideUp until now you’ve learned about the general idea of what ML does, set up your environment, and got to know about the working of your coding environment i.e. Jupyter Notebook. In this section, you’ll learn about a very powerful library called Numpy. We’ll learn about Numpy Array(np array for short) and operations on them,…
- Python Pandas Tutorial: A Complete Introduction for BeginnersIn the previous section, we learned about Numpy and how we can use it to load, save, and pre-process data easily by using Numpy Arrays. Now Numpy is a great library to do data preprocessing but I’d like to tell you all about another wonderful Python library called Pandas. At the end of this tutorial,…
- Matplotlib Python: A Beginner’s WalkthroughWe know how to analyze data by analyzing the statistics of the data and we’ve learned how to manipulate the data. But is statistics enough to analyze the data? Short answer, Visualization of data is necessary in order to find details that we missed that’s why Matplotlib Python is the best library to visualize data…
- Seaborn: Create Elegant PlotsIn the previous tutorial, we learned why data visualization is important and how we can create plots using matplotlib. In this tutorial, we’ll learn about another data visualization library called Seaborn, which is built on top of matplotlib. But why do we need seaborn if we have matplotlib? Using seaborn you can make plots that…
- Set up Python EnvironmentNow, it’s time to install the tools that we will use to write programs. So, we will be learning to Set up Python Environment in this article. Let’s start. 1. Installing Python first. First, we need to go to the official site of python: https://www.python.org/ Now we need to go to the downloads page of…
- Linear Regression: Your 1st Step in Machine LearningHi guys! So until now, we’ve learned about how we can use libraries to play with data. We did data analysis on a real dataset and we also learned how to visualize data. But what was the purpose behind it? Why do so many things? What are we trying to achieve? I’ll tell you all…