
What is Inventory Management System Project In Python?
In this tutorial, Inventory Management System Project In Python, we are going to learn about businesses such as types of goods and when to order. Keeps track from purchase to sale. This technique of inventory management keeps track of adequate stock of the goods to satisfy the clients. It helps in saving money and meeting the customer’s demands. Hence for any business, it is important to maintain the supply chain.
The inventory management system project in python with source code is a GUI-based project that uses the Tkinter module and MYSQL server for programming.
Here we will understand the project in detail.
Inventory Management System Project in Python: Project Details
| Project Name: | Inventory Management System Project In Python |
| Abstract | It’s a GUI-based project used with the Tkinter module to organize all the elements that work under inventory management. |
| Language/s Used: | Python |
| IDE | Pycharm(Recommended) |
| Python version (Recommended): | 3.8 or 3.9 |
| Database: | MySQL |
| Type: | Desktop Application |
Functions of Inventory management system in python
· Managing all the Products
· Look after the sales and Inventory management system
· Generation of the bills
Use of Pycharm IDE for the project
- First Install Pycharm Community Edition 2021.3.1 (community edition is to be installed)
- Create New Project by clicking on File and selecting New Project, writing the project name, and clicking on “Create”.
- Right-click on the project name you have created and Create 3 New Python Files as “inventory.py”,” Inserttodatabase.py”, and “Updatedatabase.py”.
- Write the code in the file and execute the Python Program for the inventory management system by Clicking the Run tab.
Installing MySQL Server Database and mysql-connector-python
- Download mysql-installer community 8.0.29.0 and install MySQL Database.
- Complete Guide to install MySQL Server Database and mysql-connector-python
- Before Importing the mysql.connector in first install the connector using pip3 install mysql-connector-python” in the terminal or command prompt to perform the database connectivity.
Creating the database and tables
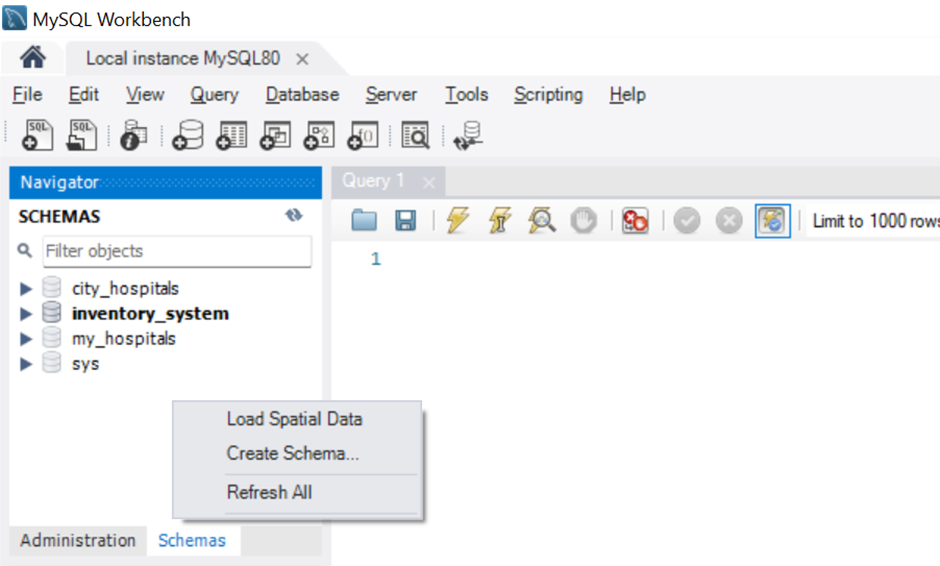
1. Create a database in MYSQL workbench Step1: Go to MySQL Workbench Click on the Local Instance MySQL80 and provide the password.

2. Create a database i.e Schema by right-clicking in the schemas and selecting create schema and creating “inventory_system“.
3. Create a table inventory and transaction by right-clicking on the Tables in the inventory_system schema. Create the columns for the inventory and transaction as follows:
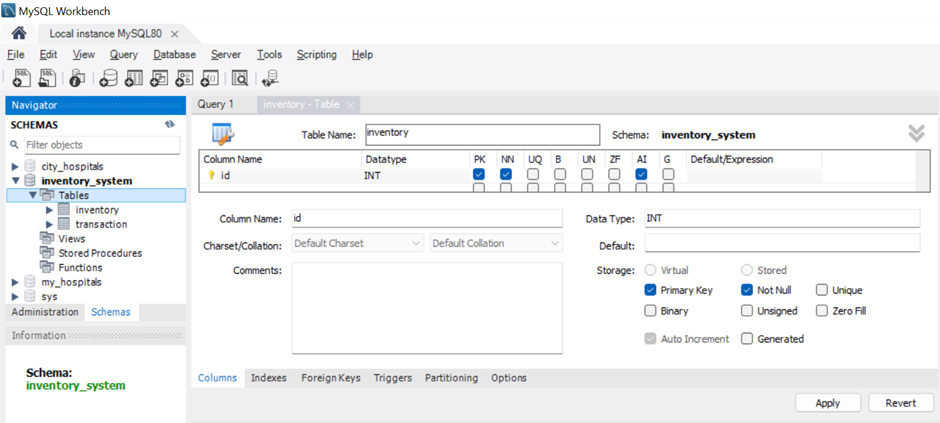
4. Create the columns for the inventory and transaction tables as follows:
For Inventory table

For Transaction Table

(Complete Guide to creating a table in Mysql Workbench.)
Note: You can install the modules by going to “File”->” Settings”-> ”Project: Inventory Management”->” Python Interpreter”->click on the”+” sign and write the name of the module want to install and click on “Install package”.
Python Program of Inventory Management system with source code and Output
Create inventory.py file
Importing the libraries
#import all the modules
from tkinter import *
from tkinter import messagebox

import mysql.connector
from mysql.connector import Error
import tkinter.messagebox
import datetime
import math
Explanation:
1. Tkinter – To create the GUI.
2. mysql.connector– For making database connections with the MySQL server
3. Datetime.date – To convert the date from the tree to a Datetime.date instance so that it can be set in.
4. Tkinter.messagebox – To show a display box, displaying some information or an error. 5. math- For performing the calculations
Create the main form of the inventory management system
class Application():
    def __init__(self,master,*args,**kwargs):
        self.master=master

        self.left=Frame(master,width=750,height=768,bg='SkyBlue')
        self.left.pack(side=LEFT)

        self.right = Frame(master, width=500, height=500, bg='white')
        self.right.pack(side=RIGHT)


        #components
        self.heading=Label(self.left,text="MARVELS STORE",font=('ALGERIAN 40 bold'),fg='Black')
        self.heading.place(x=100,y=10)

        self.date_l=Label(self.right,text="Date: "+str(date),font=('Calibri 18 bold'),fg='black')
        self.date_l.place(x=140,y=0)

        #table invoice=======================================================
        self.tproduct=Label(self.right,text="Products",font=('Calibri 20 bold'),fg='Black')
        self.tproduct.place(x=0,y=60)

        self.tquantity = Label(self.right, text="Quantity", font=('Calibri 20 bold'),fg='Black')
        self.tquantity.place(x=150, y=60)

        self.tamount = Label(self.right, text="Price", font=('Calibri 20 bold'), fg='Black')
        self.tamount.place(x=300, y=60)

        #enter stuff
        self.enterid=Label(self.left,text="ID Number",font=('calibri 20 bold'),fg='black')
        self.enterid.place(x=50,y=80)


        self.enteride=Entry(self.left,width=25,font=('Calibri 18 bold'),bg='lightblue')
        self.enteride.place(x=220,y=80)
        self.enteride.focus()

        #button
        self.search_btn=Button(self.left,text="Find",width=18,height=2,bg='green',command=self.ajax)
        self.search_btn.place(x=580,y=70)
        #fill it later by the fuction ajax

        self.productname=Label(self.left,text="",font=('Calibri 27 bold'),bg='white',fg='steelblue')
        self.productname.place(x=0,y=200)

        self.pprice = Label(self.left, text="", font=('Calibri 27 bold'), bg='white', fg='steelblue')
        self.pprice.place(x=0, y=250)

        #total label
        self.total_l=Label(self.right,text="",font=('arial 40 bold'),bg='lightblue',fg='white')
        self.total_l.place(x=0,y=400)
Explanation:
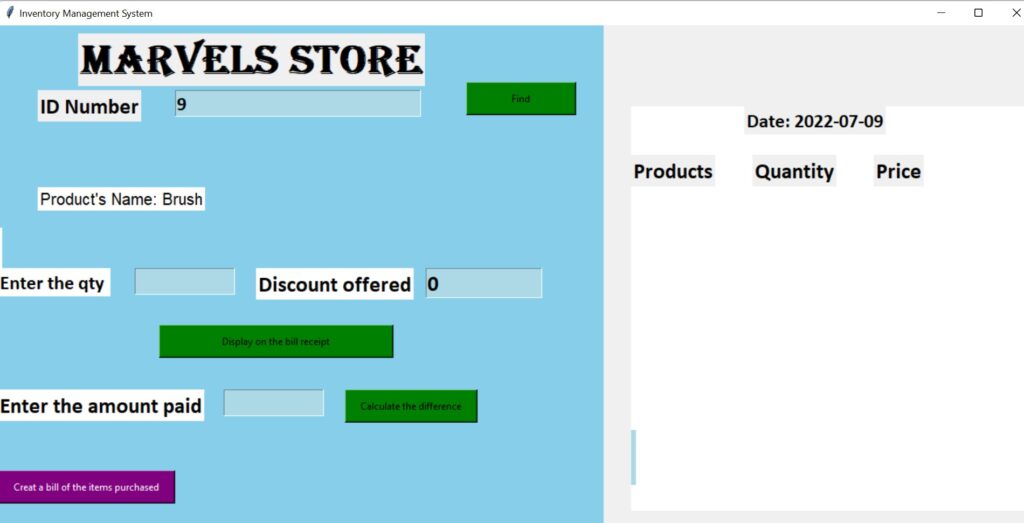
Here in class Application, we have to create the main form where we create two frames left and right frame by putting the labels, buttons, and text fields into the frames of specific sizes.
Output:
The function of database connection and displaying the products information
def ajax(self,*args,**kwargs):
    self.conn = mysql.connector.connect(host='localhost',
                                   database='inventory_system',
                                   user='root',
                                   password='admin')
    self.get_id=self.enteride.get()
    #get the product info with that id and fill i the labels above
    self.mycursor = self.conn.cursor()
    self.mycursor.execute("SELECT * FROM inventory WHERE id= %s",[self.get_id])
    self.pc = self.mycursor.fetchall()
    if self.pc:
      for self.r in self.pc:
        self.get_id=self.r[0]
        self.get_name=self.r[1]
        self.get_price=self.r[3]
        self.get_stock=self.r[2]
      self.productname.configure(text="Product's Name: " +str(self.get_name),fg='black',bg='white',font=('calibri,20,bold'))
      self.productname.place(x=50,y=200)
      #self.pprice.configure(text="Cost of the product:"+str(self.get_price),fg='black')


    #craete the quantity and the discount label
      self.quantityl=Label(self.left,text="Enter the qty ",font=('Calibri 18 bold'),fg='black',bg='white')
      self.quantityl.place(x=0,y=300)

      self.quantity_e=Entry(self.left,width=10,font=('Calibri 18 bold'),bg='lightblue')
      self.quantity_e.place(x=170,y=300)
      self.quantity_e.focus()

    #discount
      self.discount_l = Label(self.left, text="Discount offered", font=('Calibri 20 bold'),fg='black',bg='white')
      self.discount_l.place(x=320, y=300)


      self.discount_e = Entry(self.left, width=10, font=('Calibri 20 bold'), bg='lightblue')
      self.discount_e.place(x=530, y=300)
      self.discount_e.insert(END,0)


    #add to cart button
      self.add_to_cart_btn = Button(self.left, text="Display on the bill receipt", width=40, height=2, bg='green',command=self.add_to_cart)
      self.add_to_cart_btn.place(x=200, y=370)

    #genrate bill and change
      self.change_l=Label(self.left,text="Enter the amount paid",font=('Calibri 20 bold'),fg='black',bg='white')
      self.change_l.place(x=0,y=450)

      self.change_e=Entry(self.left,width=10,font=('Calibri 18 bold'),bg='lightblue')
      self.change_e.place(x=280,y=450)

      self.change_btn= Button(self.left, text="Calculate the difference", width=22, height=2, bg='green',command=self.change_func)
      self.change_btn.place(x=430, y=450)

    #geneerate bill button
      self.bill_btn = Button(self.left, text="Creat a bill of the items purchased", width=30, height=2, bg='Purple',fg='white',command=self.generate_bill)
      self.bill_btn.place(x=0, y=550)
    else:
         messagebox.showinfo("successfully completed")
Explanation:
In the code def ajax, the database connection to “inventory_system” is made by using the connect function. Once we provide the id in the Product’s id field. The SQL query is executed and checks the inventory table for the related information. Once we found the id, the product’s name and the price are displayed on the form. Later we create the quantity and discount offered labels and text fields. As well as Display bills and generate bill buttons.
Function for add to cart and calculate change for inventory management system
def add_to_cart(self,*args,**kwargs):
    self.quantity_value=int(self.quantity_e.get())

    if  self .quantity_value >int(self.get_stock):
        tkinter.messagebox.showinfo("Error","Not that any products in our stock.")
    else:
        #calculate the price first
        self.final_price=(float(self.quantity_value) * float(self.get_price))-(float(self.discount_e.get()))
        products_list.append(self.get_name)
        product_price.append(self.final_price)
        product_quantity.append(self.quantity_value)
        product_id.append(self.get_id)

        self.x_index=0
        self.y_index=100
        self.counter=0
        for self.p in products_list:
            self.tempname=Label(self.right,text=str(products_list[self.counter]),font=('arial 18 bold'),bg='gray',fg='white')
            self.tempname.place(x=0,y=self.y_index)
            self.tempqt = Label(self.right, text=str(product_quantity[self.counter]), font=('arial 18 bold'), bg='gray', fg='white')
            self.tempqt.place(x=150, y=self.y_index)
            self.tempprice = Label(self.right, text=str(product_price[self.counter]), font=('arial 18 bold'), bg='gray', fg='white')
            self.tempprice.place(x=300, y=self.y_index)

            self.y_index+=40
            self.counter+=1


            #total confugure
            self.total_l.configure(text="Final amount=Rs. "+str(sum(product_price)),bg='gray',fg='white',font=('20'))
            self.total_l.place(x=180,y=450)
            #delete
            self.quantity_e.place_forget()
            self.discount_l.place_forget()
            self.discount_e.place_forget()
            self.productname.configure(text="")
            self.pprice.configure(text="")
            self.add_to_cart_btn.destroy()
            #autofocus to the enter id
            self.enteride.focus()
            self.quantityl.focus()
            self.enteride.delete(0,END)

def change_func(self,*args,**kwargs):
    self.amount_given=float(self.change_e.get())
    self.our_total=float(sum(product_price))

    self.to_give=self.amount_given-self.our_total

    #label change
    self.c_amount=Label(self.left,text="Change is Rs. "+str(self.to_give),font=('Calibri 20 bold'),fg='Black',bg='white')
    self.c_amount.place(x=0 ,y=500)

def generate_bill(self,*args,**kwargs):
    self.mycursor.execute("SELECT * FROM inventory WHERE id=%s",[self.get_id])
    self.pc = self.mycursor.fetchall()
    for r in self.pc:
        self.old_stock=r[2]
    for i in products_list:
        for r in self.pc:
            self.old_stock = r[2]
        self.new_stock=int(self.old_stock) - int(self.quantity_value)
        #updating the stock
        self.mycursor.execute("UPDATE inventory SET stock=%s WHERE id=%s",[self.new_stock,self.get_id])
        self.conn.commit()

        #inster into transcation
        self.mycursor.execute("INSERT INTO transaction (product_name,quantity,amount,date) VALUES(%s,%s,%s,%s)",[self.get_name,self.quantity_value,self.get_price,date])
        self.conn.commit()
        print("Decreased")

    tkinter.messagebox.showinfo("successfully done")
Explanation:
In the code blocks:
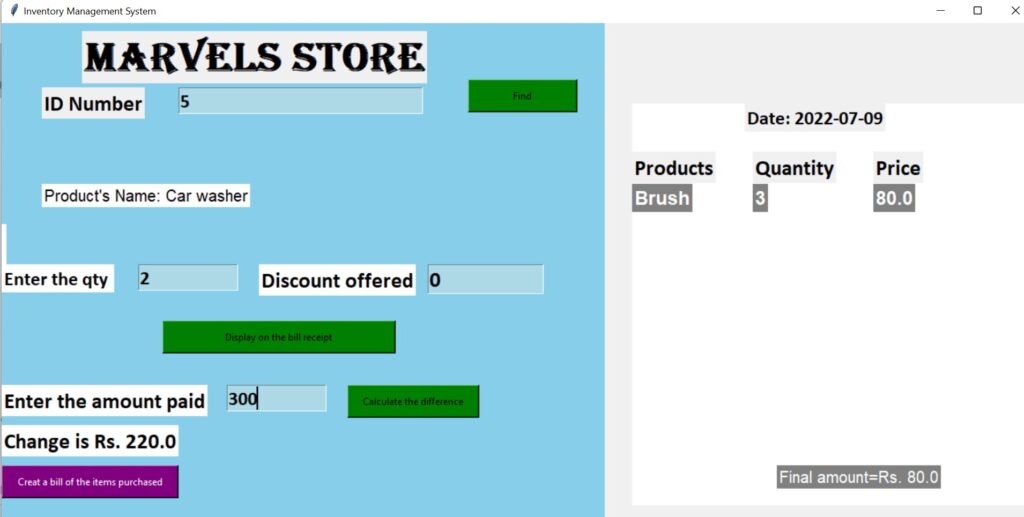
The def add_to_Cart(): the self.quantity_value takes the value for the quantity. Then it checks whether the quantity provided and stock are matching. Here we are using the if-else function to check If the quantity provided is higher than the stock available then it displays the message “Error”, “Not that any products in our stock.” Else it will take the quantity and discount. Once we click on add to cart the product’s name and quantity are displayed on the cart and the amount is calculated and displayed below the amounts field.
The def_change (): To calculate the change in the total amount. Once we enter the amount and click on generate a bill. The changed amount is deducted from the total amount and is displayed on the screen.
The def_generate bill() section checks for the id and fetches the information for the particular id. It checks for the stocks, deducts the old stocks and generates a new stock, updates the inventory table, and set the new stock number for the particular id. The system inserts this data into the transaction table.
Output:
Create inerttodatabase.py
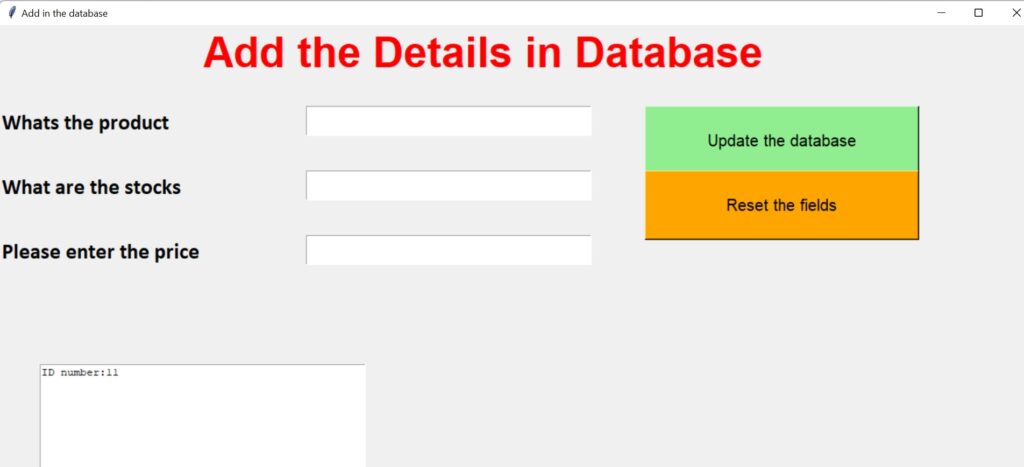
Creating the form for adding the data in the database of the inventory table
class Database:
    def __init__(self,master,*args,**kwargs):
         self.master=master
         self.heading=Label(master,text="Add the Details in Database",font=('arial 40 bold'),fg='Red')
         self.heading.place(x=250,y=0)


         #lables  for the window
         self.name_l=Label(master,text="Whats the product",font=('Calibri 20 bold'))
         self.name_l.place(x=0,y=100)

         self.stock_l=Label(master,text="What are the stocks",font=('Calibri 20 bold'))
         self.stock_l.place(x=0,y=180)

         self.cp_l = Label(master, text="Please enter the price ", font=('Calibri 20 bold'))
         self.cp_l.place(x=0, y=260)


        #enteries for window

         self.name_e=Entry(master,width=25,font=('Calibri 20 bold'))
         self.name_e.place(x=380,y=100)

         self.stock_e = Entry(master, width=25, font=('Calibri 20 bold'))
         self.stock_e.place(x=380, y=180)

         self.cp_e = Entry(master, width=25, font=('Calibri 20 bold'))
         self.cp_e.place(x=380, y=260)

         #button to add to the database
         self.btn_add=Button(master,text='Update the database',width=30,height=3,bg='Lightgreen',fg='Black',command=self.get_items,font=2)
         self.btn_add.place(x=800,y=100)

         self.btn_clear=Button(master,text="Reset the fields",width=30,height=3,bg='Orange',fg='Black',command=self.clear_all,font=2)
         self.btn_clear.place(x=800,y=180)

          #text box for the log
         self.tbBox=Text(master,width=50,height=10)
         self.tbBox.place(x=50,y=420)
         self.tbBox.insert(END,"ID number:"+str(id))

         self.master.bind('<Return>', self.get_items)
         self.master.bind('<Up>', self.clear_all)
Explanation:
The class Database: Here we create the layout of the database table “inventory” where we provide all labels, entry fields, buttons, size and color of the text, and the position of each field onto the form.
Output:
Function for accepting the data and clearing the text fields
def get_items(self, *args, **kwargs):
# get from entries
   self.name = self.name_e.get()
   self.stock = self.stock_e.get()
   self.cp = self.cp_e.get()

# dynamic entries
   if self.name == '' or self.stock == '' or self.cp == '':
    tkinter.messagebox.showinfo("Error", "Please Fill all the entries.")
   else:
    mycursor.execute("INSERT INTO inventory(name, stock, price) VALUES(%s,%s,%s)",[self.name,self.stock,self.cp])
    conn.commit()
    # textbox insert
    self.tbBox.insert(END, "\n\nInserted " + str(self.name) + " into the database with the quantity of " + str(self.stock))
    tkinter.messagebox.showinfo("Success", "Successfully added to the database")


def clear_all(self, *args, **kwargs):
   num = id + 1
   self.name_e.delete(0, END)
   self.stock_e.delete(0, END)
   self.cp_e.delete(0, END)
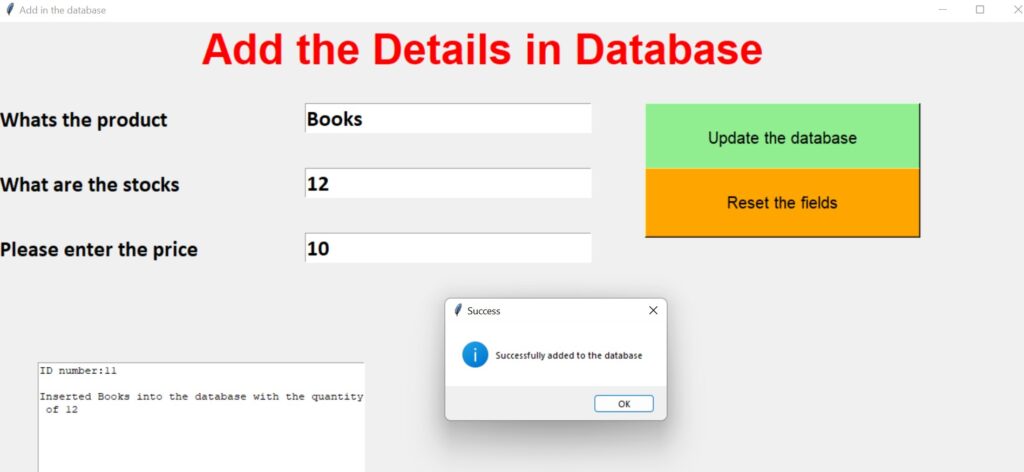
Explanation:
In the function def get_items(), we are initializing the variables for name, stock, and price with the help of the get() function. The values entered are stored in these variables. The if block will check if any of these fields are empty, it will show an error message “Error”, “Please Fill all the entries.” Otherwise, it will execute the SQL query and insert those values in the inventory table, and prints the message “Success”, and “Successfully added to the database”.
The def clear_all() will autoincrement the id and clears all the text fields for adding another data into the table.
Output:
Create a Updatedatabase.py file
Create a form of updating the inventory management system.
class Database:
    def __init__(self,master,*args,**kwargs):
         self.master=master
         self.heading=Label(master,text="DATABASE UPDATION",font=('arial 40 bold'),fg='Red')
         self.heading.place(x=400,y=0)

         #label and entry for id
         self.id_le=Label(master,text="Please enter the ID",font=('Calibri 20 bold'))
         self.id_le.place(x=0,y=100)

         self.id_leb=Entry(master,font=('Calibri 20 bold'),width=10)
         self.id_leb.place(x=380,y=100)

         self.btn_search=Button(master,text="Search",width=15,height=2,bg='Blue',command=self.search)
         self.btn_search.place(x=550,y=100)

         #lables  for the window
         self.name_l=Label(master,text="What's the product",font=('Calibri 20 bold'))
         self.name_l.place(x=0,y=180)

         self.stock_l=Label(master,text="How much is the stock",font=('Calibri 20 bold'))
         self.stock_l.place(x=0,y=260)

         self.cp_l = Label(master, text="Please enter the price ", font=('Calibri 20 bold'))
         self.cp_l.place(x=0, y=340)


        #enteries for window

         self.name_e=Entry(master,width=25,font=('Calibri 20 bold'))
         self.name_e.place(x=380,y=180)

         self.stock_e = Entry(master, width=25, font=('Calibri 20 bold'))
         self.stock_e.place(x=380, y=260)

         self.cp_e = Entry(master, width=25, font=('Calibri 20 bold'))
         self.cp_e.place(x=380, y=340)


         #button to add to the database
         self.btn_add=Button(master,text='Fill in the database',width=30,height=2,bg='SkyBlue',fg='black',command=self.update,font=2)
         self.btn_add.place(x=400,y=400)
Explanation:
Here the max(id) function displays the id number onto the display.
The Class database
We create here the layout of the form where we provide all labels, entry fields, buttons, size and color of the text, and position of each field onto the form to make updates on the table.
Output:

Function to search and update the table
def search(self, *args, **kwargs):
     mycursor.execute("SELECT * FROM inventory WHERE id=%s",[self.id_leb.get()])
     result = mycursor.fetchall()
     for r in result:
          self.n1 = r[1]  # name
          self.n2 = r[2]  # stock
          self.n3 = r[3]  # cp
     conn.commit()

      #inster into the enteries to update
     self.name_e.delete(0,END)
     self.name_e.insert(0, str(self.n1))

     self.stock_e.delete(0, END)
     self.stock_e.insert(0, str(self.n2))

     self.cp_e.delete(0, END)
     self.cp_e.insert(0, str(self.n3))

def update(self,*args,**kwargs):
      self.u1=self.name_e.get()
      self.u2 = self.stock_e.get()
      self.u3 = self.cp_e.get()


      mycursor.execute("UPDATE  inventory SET name=%s,stock=%s,price=%s WHERE id=%s",[self.u1,self.u2,self.u3,self.id_leb.get()])
      conn.commit()
      tkinter.messagebox.showinfo("Success","Database updated successfully")
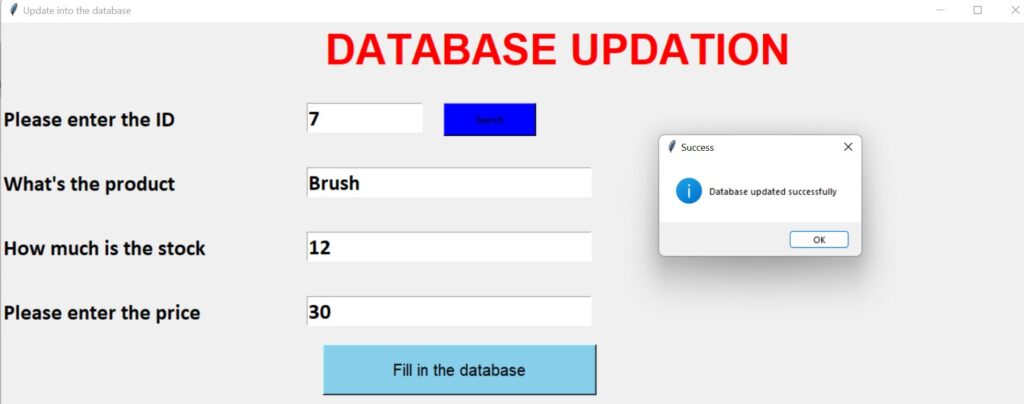
Explanation:
def search(): Once you enter the id and click the search button, all the information related to the id is displayed on the text fields.
def update(): This function will take the changes made in those fields and update those changes in the inventory table.
Output:
Complete Source Code of Inventory Management system project in Python
Summary
Hence in our tutorial, we have learned to develop an inventory management system in python with source code using the Tkinter library making use of the database MySQL server for database connection and performing all the tasks of inventory management.
We hope this article is useful for all python beginners. For more articles on python, keep visiting our website.
Thank you for reading this article.
Also Read:
- Create your own ChatGPT with Python
- SQLite | CRUD Operations in Python
- Event Management System Project in Python
- Ticket Booking and Management in Python
- Hostel Management System Project in Python
- Sales Management System Project in Python
- Bank Management System Project in C++
- Python Download File from URL | 4 Methods
- Python Programming Examples | Fundamental Programs in Python
- Spell Checker in Python
- Portfolio Management System in Python
- Stickman Game in Python
- Contact Book project in Python
- Loan Management System Project in Python
- Cab Booking System in Python
- Brick Breaker Game in Python
- Tank game in Python
- GUI Piano in Python
- Ludo Game in Python
- Rock Paper Scissors Game in Python
- Snake and Ladder Game in Python
- Puzzle Game in Python
- Medical Store Management System Project in Python
- Creating Dino Game in Python
- Tic Tac Toe Game in Python
- Test Typing Speed using Python App
- Scientific Calculator in Python
- GUI To-Do List App in Python Tkinter
- Scientific Calculator in Python using Tkinter
- GUI Chat Application in Python Tkinter

