What is the CRUD operation?
In this article, we are going to learn about the CRUD operations in Springboot and MySQL with implementation. CRUD is an acronym that denotes the four operations in a database such as Create, Read, Update and Delete. Before starting with this topic, check out our article on CRUD operations in Java. Let’s review each of the four components in CRUD in-depth with implementation in Spring Boot and MySQL.
How CRUD Operations in Springboot works
The CRUD operations refer to all major functions that are implemented in relational database applications and REST API. Each operation of the CRUD can map to a SQL statement and HTTP methods. Suppose, if we want to create a new resource, we should use the HTTP method POST. To read a resource we use the GET method and to update a record, we should use the PUT method. Similarly, if we want to delete a record, we should use the DELETE method. Rest APIs make it possible to establish communication between a backend server and a frontend web or mobile application.
Create in CRUD operations
The Create function allows users to create a new resource in the database. In the SQL relational database application with Springboot, the Create function is called POST. For the spring boot crud example, when a new employee is hired, the HR department creates a new resource for the employee. As a result, a new record will be created in the database.
Read or Retrieve in CRUD operations
The Read function is similar to a GET function. It allows users to search and retrieve specific resources in the table and read their values. For the spring boot crud example, If the company needs to send a letter to one or more employees, the read function might be used to find the correct mailing address for the employee.
Update in CRUD operations
The Update function is similar to the PUT method, which is used to modify existing records that exist in the database. Users may have to modify information in multiple fields to fully change a resource. For spring boot crud example, If an employee’s salary or contact information changes, the HR department may need to update the existing record of the employee
Delete in CRUD operations
The Delete function allows users to remove resources from a database that is no longer needed. For the spring boot crud example, If an employee leaves the company, the company may choose to delete their information in the database.
To know more about what are crud operations in a database, click here.
Crud Repository and JPA Repository in Springboot
Spring Boot greatly simplifies Java enterprise applications and RESTful APIs development by providing default configuration and best practices. Spring Boot provides an interface called CrudRepository that contains methods for CRUD operations. It is defined in the package org.springframework.data.repository and it extends the Spring Data Repository interface. Another one known as JpaRepository provides JPA-related methods such as flushing, persistence context, and deleting a record in a batch. It is defined in the package org.springframework.data.jpa.repository. JpaRepository extends CrudRepository. We are going to use JPA Repository in our project.
Project Setup for CRUD operations in Springboot
In this project, we must have the following software programs installed on the computer:
- Java Development Kit (JDK 1.8 or newer)
- MySQL Database server (Xampp)
- A Java IDE (Eclipse IDE, NetBeans or IntelliJ)
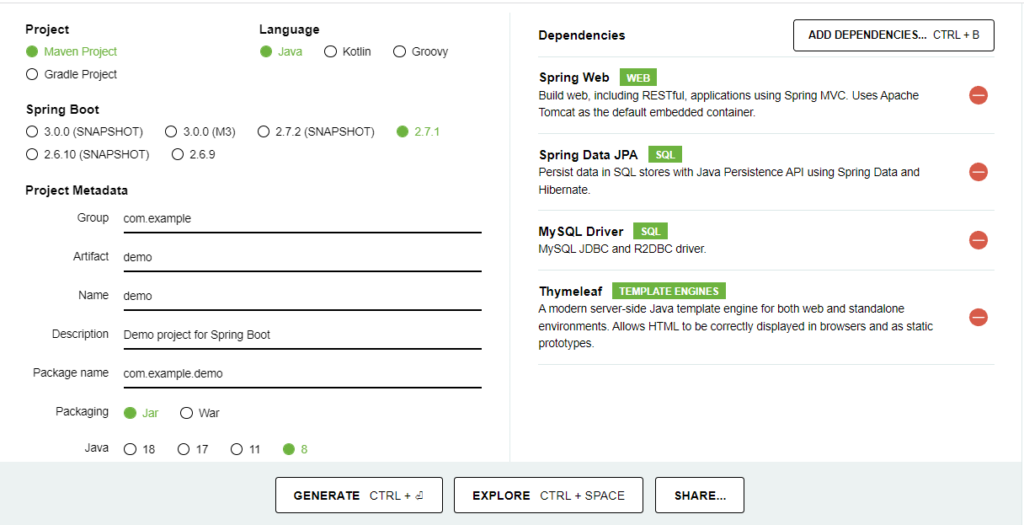
First open Spring Initializr http://start.spring.io. After launching the Spring Initializr, Select the Spring Boot version. Then, Add the dependencies Spring Web, Spring Data JPA, MySQL Driver, and Thymeleaf. Click on the Generate button. When we click on the Generate button, it wraps the specifications in a zip file and downloads it to the local system.

Once the download is complete, Extract the zip file Import the project folder into the Eclipse IDE, and name the project as a company.
Implementation of CRUD operations in Springboot
When you import the downloaded spring boot application by default CompanyApplication.java is created which consists of the basic template for the application.
CompanyApplication.java
import org.springframework.boot.SpringApplication;
import org.springframework.boot.autoconfigure.SpringBootApplication;
@SpringBootApplication
public class companyApplication {
public static void main(String[] args) {
SpringApplication.run(companyApplication.class, args);
}
}
After successfully importing the project files, Open the Xampp server and go to PhpMyAdmin and create a database company inside that create a table employee with attributes id, name, mobile, and salary. Then, in the Eclipse IDE you have to Create the package com.example.company.service. Inside the package, you have to create the class EmployeeService.
EmployeeService.java
package com.example.company.controller;
import java.util.List;
import org.springframework.beans.factory.annotation.Autowired;
import org.springframework.stereotype.Controller;
import org.springframework.ui.Model;
import org.springframework.web.bind.annotation.GetMapping;
import org.springframework.web.bind.annotation.ModelAttribute;
import org.springframework.web.bind.annotation.PathVariable;
import org.springframework.web.bind.annotation.RequestMapping;
import org.springframework.web.bind.annotation.RequestMethod;
import org.springframework.web.servlet.ModelAndView;
import com.example.company.domain.Employee;
import com.example.company.service.EmployeeService;
@Controller
public class EmployeeController {
    @Autowired
    private EmployeeService service;
    @GetMapping("/")
    public String viewHomePage(Model model) {
        List < Employee > listemployee = service.listAll();
        model.addAttribute("listemployee", listemployee);
        System.out.print("Get / ");
        return "index";
    }
    @GetMapping("/new")
    public String add(Model model) {
        model.addAttribute("employee", new Employee());
        return "new";
    }
    @RequestMapping(value = "/save", method = RequestMethod.POST)
    public String saveEmployee(@ModelAttribute("employee") Employee emp) {
        service.save(emp);
        return "redirect:/";
    }
    @RequestMapping("/edit/{id}")
    public ModelAndView showEditEmployeePage(@PathVariable(name = "id") int id) {
        ModelAndView mav = new ModelAndView("new");
        Employee emp = service.get(id);
        mav.addObject("employee", emp);
        return mav;
    }
    @RequestMapping("/delete/{id}")
    public String deleteEmployeePage(@PathVariable(name = "id") int id) {
        service.delete(id);
        return "redirect:/";
    }
}
After that you have to Create the package com.example.company.controller. Inside the package, you have to create the class EmployeeController. This class deals with RESTful APIs for CRUD operations.
EmployeeController.java
package com.example.company.controller;
import java.util.List;
import org.springframework.beans.factory.annotation.Autowired;
import org.springframework.stereotype.Controller;
import org.springframework.ui.Model;
import org.springframework.web.bind.annotation.GetMapping;
import org.springframework.web.bind.annotation.ModelAttribute;
import org.springframework.web.bind.annotation.PathVariable;
import org.springframework.web.bind.annotation.RequestMapping;
import org.springframework.web.bind.annotation.RequestMethod;
import org.springframework.web.servlet.ModelAndView;
import com.example.company.domain.Employee;
import com.example.company.service.EmployeeService;
@Controller
public class EmployeeController {
    @Autowired
    private EmployeeService service;
    @GetMapping("/")
    public String viewHomePage(Model model) {
        List < Employee > listemployee = service.listAll();
        model.addAttribute("listemployee", listemployee);
        System.out.print("Get / ");
        return "index";
    }
    @GetMapping("/new")
    public String add(Model model) {
        model.addAttribute("employee", new Employee());
        return "new";
    }
    @RequestMapping(value = "/save", method = RequestMethod.POST)
    public String saveEmployee(@ModelAttribute("employee") Employee emp) {
        service.save(emp);
        return "redirect:/";
    }
    @RequestMapping("/edit/{id}")
    public ModelAndView showEditEmployeePage(@PathVariable(name = "id") int id) {
        ModelAndView mav = new ModelAndView("new");
        Employee emp = service.get(id);
        mav.addObject("employee", emp);
        return mav;
    }
    @RequestMapping("/delete/{id}")
    public String deleteEmployeePage(@PathVariable(name = "id") int id) {
        service.delete(id);
        return "redirect:/";
    }
}
Then, you must create the package com.example.company.repository inside the package you have to create an EmployeeRepository.java file. EmployeeRepository interface extends the JPARepository interface which is used to perform the CRUD operations in Springboot.
EmployeeRepository.java
package com.example.company.repository;
import org.springframework.data.jpa.repository.JpaRepository;
import org.springframework.stereotype.Repository;
import com.example.company.domain.Employee;
@Repository
public interface EmployeeRepository extends JpaRepository {
}
Then, you must Create the package com.example.company.domain inside the package you have to create the class Employee. This class retrieves the information from the database and displays it to the user.
Employee.java
import javax.persistence.Entity;
import javax.persistence.GeneratedValue;
import javax.persistence.GenerationType;
import javax.persistence.Id;
@Entity
public class Employee {
    @Id
    @GeneratedValue(strategy = GenerationType.IDENTITY)
    private Long id;
    private String ename;
    private int mobile;
    private int salary;
    public Employee() {}
    public Employee(Long id, String ename, int mobile, int salary) {
        this.id = id;
        this.ename = ename;
        this.mobile = mobile;
        this.salary = salary;
    }
    public Long getId() {
        return id;
    }
    public void setId(Long id) {
        this.id = id;
    }
    public String getEname() {
        return ename;
    }
    public void setEname(String ename) {
        this.ename = ename;
    }
    public int getMobile() {
        return mobile;
    }
    public void setMobile(int mobile) {
        this.mobile = mobile;
    }
    public int getSalary() {
        return salary;
    }
    public void setSalary(int salary) {
        this.salary = salary;
    }
    @Override
    public String toString() {
        return "Employee [id=" + id + ", ename=" + ename + ", mobile=" + mobile + ", salary=" + salary + "]";
    }
}
After that, you have to create the index.html page inside the folder src/main/resources. This file is created to create a User Interface to perform CRUD operations in Springboot and MYSQL.
index.html
<!DOCTYPE html>
<html xmlns="http://www.w3.org/1999/xhtml"
      xmlns:th="http://www.thymeleaf.org">
<head>
	<link rel="stylesheet" href="https://stackpath.bootstrapcdn.com/bootswatch/4.5.2/cosmo/bootstrap.min.css" />
	<script src= "https://stackpath.bootstrapcdn.com/bootstrap/4.5.2/js/bootstrap.min.js" ></script>
</head>
<body>
<div>
	<h2 >Spring Boot Crud System - Employee Registation</h2>
	<tr>
		<div align = "left" >
		     <h3><a  th:href="@{'/new'}">Add new</a></h3>
	    </div>
	</tr>
	<tr>
	<div class="col-sm-5" align = "center">
                 <div class="panel-body" align = "center" >
                 <table class="table">
  <thead class="thead-dark">
    <tr>
      		<th>Employee ID</th>
            <th>Employee Name</th>
            <th>Mobile</th>
            <th>Salary</th>
            <th>edit</th>
             <th>delete</th>
   	</tr>
  </thead>
  <tbody>
      <tr  th:each="employee : ${listemployee}">
		<td th:text="${employee.id}">Employee ID</td>
		<td th:text="${employee.ename}">Employee Name</td>
		<td th:text="${employee.mobile}">Mobile</td>
		<td th:text="${employee.salary}">Salary</td>
		<td>
			<a th:href="@{'/edit/' + ${employee.id}}">Edit</a>
		</td>
		<td>
			<a th:href="@{'/delete/' + ${employee.id}}">Delete</a>
		</td>
		</tr>
  </tbody>
</table>
                 </div>
            </div>
	</tr>
	</tbody>
	</table>
	<div>
</body>
</html>
Inside the src/main/resources folder, create another HTML file new.html. This new file is created to open a new page to create a new user.
new.html
<!DOCTYPE html>
<html xmlns="http://www.w3.org/1999/xhtml"
      xmlns:th="http://www.thymeleaf.org">
<head>
    <meta charset="utf-8" />
    <title>Create New Product</title>
    <link rel="stylesheet" href="https://stackpath.bootstrapcdn.com/bootswatch/4.5.2/cosmo/bootstrap.min.css" />
    <script src= "https://stackpath.bootstrapcdn.com/bootstrap/4.5.2/js/bootstrap.min.js" ></script>
</head>
<body>
<div align="center">
    <h1>Create New Employee</h1>
    <br />
     <div class="col-sm-4">
    <form action="#" th:action="@{/save}" th:object="${employee}" method="post">
 		<div alight="left">
            <tr>
                <label class="form-label" >Employee Name</label>
                <td>
	                <input type="hidden" th:field="*{id}" />
	                <input type="text" th:field="*{ename}" class="form-control" placeholder="Emp Name" />
                </td>
            </tr>
         </div>
          <div alight="left">
            <tr>
                <label class="form-label" >mobile</label>

                <td>
                 <input type="text" th:field="*{mobile}" class="form-control" placeholder="mobile" />
                </td>
            </tr>
         </div>
         <div alight="left">
                 <tr>
                 <label class="form-label" >salary</label>
                <td><input type="text" th:field="*{salary}" class="form-control" placeholder="salary" /></td>
            </tr>
            </div>
			<br>
            <tr>
            <td colspan="2"><button type="submit" class="btn btn-info">Save</button> </td>
            </tr>
    </form>
</div>
</body>
</html>
After that, we have to set the database path and project configuration in the application.properties file
spring.datasource.url=jdbc:mysql://localhost:3306/company?useUnicode=true&useJDBCCompliantTimezoneShift=true&useLegacyDatetimeCode=false&serverTimezone=UTC
server.error.whitelabel.enabled=false
server.port=7070
spring.datasource.username=root
spring.datasource.password=spring.jpa.open-in-view=false
spring.thymeleaf.cache=false
api.base.path = http://localhost:7070
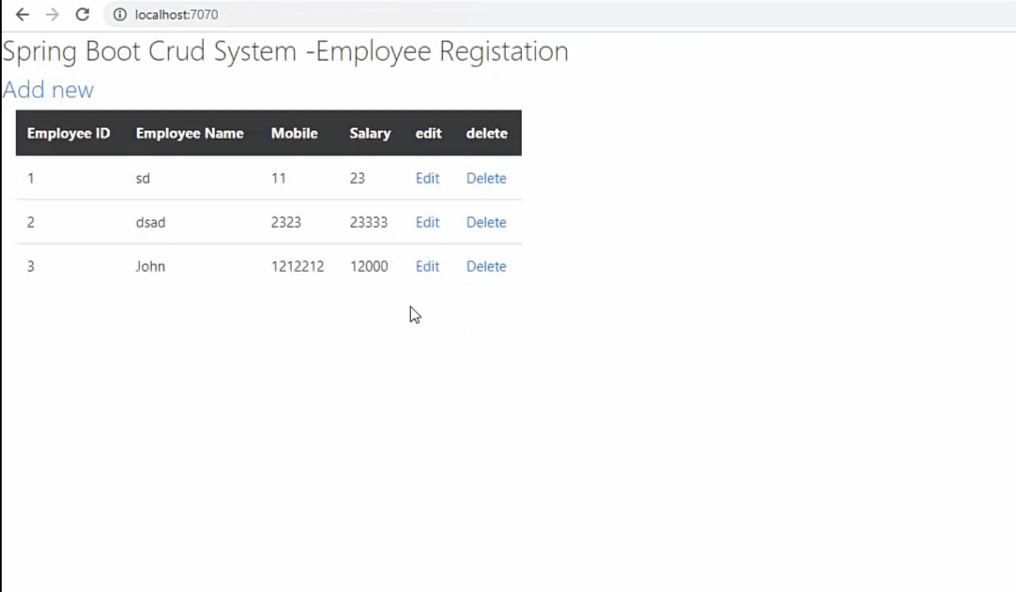
To run our application go to the browser and check the site localhost:7070. Our final application has the features to read the employee details, create new employee data, update the employee details and delete the employee data.
Output:

Summary
In this article, we have learned about the CRUD operations in Springboot and MYSQL with implementation. CRUD Operations are frequently used in database and database design cases. To sum up, in CRUD applications with Restful web service in Spring Boot, users must be able to create a new resource, have access to the data in the UI by reading a resource, update or edit the existing resource, and delete the resource.
Thank you for reading this article.
Also Read:
- Most Underrated Database Trick | Life-Saving SQL Command
- Python List Methods
- Top 5 Free HTML Resume Templates in 2024 | With Source Code
- How to See Connected Wi-Fi Passwords in Windows?
- 2023 Merry Christmas using Python Turtle
- 23 AI Tools You Won’t Believe are Free
- Python 3.12.1 is Now Available
- Best Deepfake Apps and Websites You Can Try for Fun
- Amazon launched free Prompt Engineering course: Enroll Now
- 10 GitHub Repositories to Master Machine Learning
- Hello World in 35 Programming Languages
- How to Scrape Data From Any Website with Python?
- Become Job Ready With Free Harvard Computer Science course: Enroll Now
- Free Python Certification course from Alison: Good for Resume
- Download 1000+ Projects, All B.Tech & Programming Notes, Job, Resume & Interview Guide, and More – Get Your Ultimate Programming Bundle!
- Udacity Giving Free Python Course: Here is how to Enroll
- Love Babbar’s Income Revealed
- Top 5 Websites to Learn Programming in 2024
- Python Internship for college students and freshers: Apply Here
- Microsoft Giving Free Python Course in 2023: Enroll Now
- Top 5 Free Python Courses on YouTube in 2024
- Complete Python Roadmap for Beginners in 2024
- New secrets to Earn money with Python in 2024
- Connect with HR Directly – Job Hack
- Google offering free Python course: Enroll Today
- What is an AI Tool?
- Google Internship 2024
- TCS Launched Free Certification Course with Industry Recognized Value
- Top Free AI Tools for Students and Job Seekers
- Unveiling the Future of AI Detector

